Sweet Cherry Tarts: A Bite of Nostalgia
Hey there, fellow food lovers! If there’s one dessert that brings a playful smile to my face and warms my heart, it has to be Cherry Tarts. Ah, those delightful little pastries, bursting with juicy, sweet-tart cherries nestled in a flaky crust—every bite feels like a trip back in time. Today, I’m excited to share not just a recipe but a nostalgic experience that’s all about joy, color, and, of course, a sprinkle of creativity!
Let’s start with a fun memory. Picture this: it’s summer, the sun is shining, and the air is filled with laughter. I remember running to my grandmother’s house after school, the scent of her freshly baked desserts wafting through the air. Her kitchen was my happy place, filled with colorful bowls, flour dust dancing in the sunlight, and, most importantly, her signature cherry tarts. She’d let me help her pit the cherries, always joking that if I ate one (or two, okay… maybe three!), I had to sing a silly song. It was the little moments like these that ignited my passion for cooking and baking.
The recipe I’m sharing today captures that childhood essence—the cherry filling is vibrant and sweet, the crust is wonderfully flaky, and the whole experience is like a warm hug. So, roll up your sleeves, grab that spoon, and let’s create a dessert that is not just delicious but also packed with memories!
Ingredients
Here’s what you’ll need for the perfect Cherry Tarts:
-
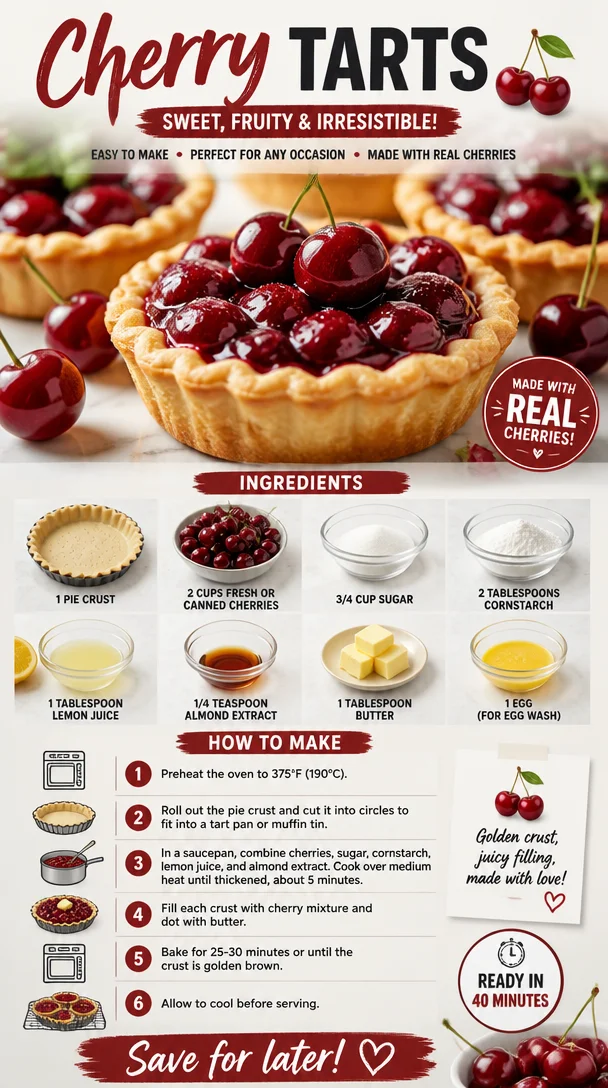
1 pie crust
You can use homemade or store-bought pie crust. If you’re feeling adventurous, making your own can be a fun experience! For a gluten-free option, simply use a gluten-free pie crust. -
2 cups fresh or canned cherries
Fresh cherries are ideal during the summer months, bursting with flavor. If you go for canned cherries, just make sure they are in light syrup or water to avoid an overly sweet filling. -
3/4 cup sugar
This will sweeten the lovely cherry filling. For a lower sugar option, feel free to substitute half with honey or a sugar alternative like stevia. -
2 tablespoons cornstarch
Cornstarch is the secret to a nicely thickened filling! If you don’t have cornstarch, you can use all-purpose flour instead—but note you may need to adjust the amount slightly. -
1 tablespoon lemon juice
This adds a refreshing zing and balances the sweetness of the cherries. If you don’t have lemon, a splash of lime juice will work too! -
1/4 teaspoon almond extract
The almond extract enhances the cherry flavor beautifully. If you want a different twist, you can use vanilla extract instead. -
1 tablespoon butter
A little dab of butter adds richness. You can substitute with a plant-based butter for a dairy-free version. -
1 egg (for egg wash)
An egg wash gives the crust that gorgeous golden brown color. If you’re avoiding eggs, milk or cream works in a pinch.
Step-by-Step Instructions
Let’s dive into the cooking adventure! Follow these steps to create your delightful Cherry Tarts:
-
Preheat Your Oven
Preheat your oven to 375°F (190°C). A hot oven means perfectly cooked tarts! Make sure to prepare your baking sheet lined with parchment paper or a non-stick mat. -
Prepare the Pie Crust
Roll out your pie crust on a floured surface to about 1/8 inch thick. Cut out circles to fit into your tart pan. If you’re using a standard pie dish, aim for about 5-6 inches in diameter. Don’t worry about perfection; a little rustic charm makes it more inviting! -
Combine Your Filling
In a mixing bowl, combine your cherries, sugar, cornstarch, lemon juice, and almond extract. Toss everything together gently until the cherries are well-coated. Did you know? If you’re using fresh cherries, you can leave a few halved for added texture! -
Fill the Tart Shell
Spoon the cherry mixture into each prepared tart shell, filling them to the brim but avoiding overflow. Drop a tiny piece of butter on top of the filling to add an extra richness that will make the flavors pop. -
Prepare the Egg Wash
In a small bowl, whisk the egg. This will be your egg wash. Gently brush the edges of the crust with the egg wash for that beautiful browning. If you’re going with a milk wash, just dab a little on the edges with a brush or your fingers. -
Bake
Place the tarts in the preheated oven for 25-30 minutes or until the crust is golden brown. Keep an eye on them to prevent burning, and the kitchen should be filled with the most mouthwatering aroma! -
Cool and Serve
Let the tarts cool on a rack for about 10-15 minutes before serving. This waiting time is crucial, as it allows the filling to set up a bit more.
Serving Suggestions
Now that you have your beautiful Cherry Tarts, here are a few ideas on how to serve them:
-
Garnish with Whipped Cream: A dollop of freshly whipped cream on top adds a wonderful creamy texture that contrasts beautifully with the cherries.
-
Serve with Vanilla Ice Cream: There’s nothing quite like the heat of a freshly baked tart pairing with the coolness of vanilla ice cream. It’s a classic that never disappoints!
-
Finish with a Sprinkle: For that flair of personality, add some colorful sprinkles on top before serving. After all, we believe in making every moment fun!
Recipe Variations
Here are several creative twists you can try with your Cherry Tarts:
-
Berry Medley Tarts: Mix cherries with blueberries and raspberries for a fruity explosion.
-
Almond Joy Filling: Add toasted coconut and chocolate chips for a tropical treat.
-
Spiced Cherry Tarts: Incorporate a pinch of cinnamon or nutmeg to give your tarts an aromatic warmth.
-
Savory Cherry Tarts: Mix cherries with goat cheese and thyme for a delicious appetizer that will wow your guests.
Chef’s Notes
Over the years, this Cherry Tart recipe has seen quite the evolution in my kitchen. I originally learned it from my grandma, but then I started playing around with different fillings and crusts. I’ve embraced using seasonal fruits, which means we’ve had peach tarts and even mixed berry creations! Each time I bake them, I get a little nostalgic but also excited about the new flavors.
Oh, and here’s a funny kitchen story: one time, I got so excited while making these tarts that I mistakenly grabbed chili powder instead of cinnamon. Let’s just say that was an unforgettable dessert experience! So, always double-check your spices!
FAQs and Troubleshooting
1. My tart crust is soggy. What went wrong?
A soggy crust can happen if the filling is too watery. Make sure to drain off any excess juice from canned cherries, or you can thicken the filling a bit more with extra cornstarch. Pre-baking the crust (blind baking) can also help prevent sogginess.
2. Can I use frozen cherries?
Absolutely! Frozen cherries work just great. Just make sure to thaw and drain them before using, as they can release extra moisture when baked.
3. How do I know when my tarts are done?
Look for a beautifully golden crust. The cherries will also start bubbling up and look deliciously inviting.
4. Can I make these ahead of time?
Yes! You can prepare the tarts and keep them in the fridge for a couple of days before baking. If you make them ahead, I recommend baking them just before serving to retain that flaky crust.
Nutritional Info
While I believe in enjoying dessert in moderation and focusing on joyful moments, here’s a rough nutritional estimate per tart (based on standard ingredients):
- Calories: ~250
- Carbohydrates: ~35g
- Fat: ~10g
- Protein: ~3g
- Sugar: ~12g
Thank you for joining me in making these scrumptious Cherry Tarts! I hope they become a delightful addition to your dessert repertoire, just like they have in mine. Remember, cooking is all about creativity and love—so don’t hesitate to make this recipe your own! Happy baking, and I can’t wait to hear your kitchen stories too!
PrintSweet Cherry Tarts
Delightful cherry tarts bursting with sweet-tart cherries in a flaky crust, capturing the essence of childhood memories.
- Prep Time: 20 minutes
- Cook Time: 30 minutes
- Total Time: 50 minutes
- Yield: 8 servings 1x
- Category: Dessert
- Method: Baking
- Cuisine: American
- Diet: Vegetarian
Ingredients
- 1 pie crust
- 2 cups fresh or canned cherries
- 3/4 cup sugar
- 2 tablespoons cornstarch
- 1 tablespoon lemon juice
- 1/4 teaspoon almond extract
- 1 tablespoon butter
- 1 egg (for egg wash)
Instructions
- Preheat your oven to 375°F (190°C).
- Prepare your pie crust on a floured surface, rolling it out to about 1/8 inch thick.
- Combine your cherries, sugar, cornstarch, lemon juice, and almond extract in a mixing bowl.
- Fill each prepared tart shell with the cherry mixture.
- Prepare the egg wash by whisking the egg and brushing the edges of the crust.
- Bake for 25-30 minutes until the crust is golden brown.
- Cool the tarts on a rack for about 10-15 minutes before serving.
Notes
For a gluten-free option, use a gluten-free pie crust. You can substitute some sugar with honey for a lower-sugar version.
Nutrition
- Serving Size: 1 tart
- Calories: 250
- Sugar: 12g
- Sodium: 100mg
- Fat: 10g
- Saturated Fat: 4g
- Unsaturated Fat: 5g
- Trans Fat: 0g
- Carbohydrates: 35g
- Fiber: 2g
- Protein: 3g
- Cholesterol: 40mg
Keywords: cherry tart, dessert, nostalgic recipe, summer dessert, baking