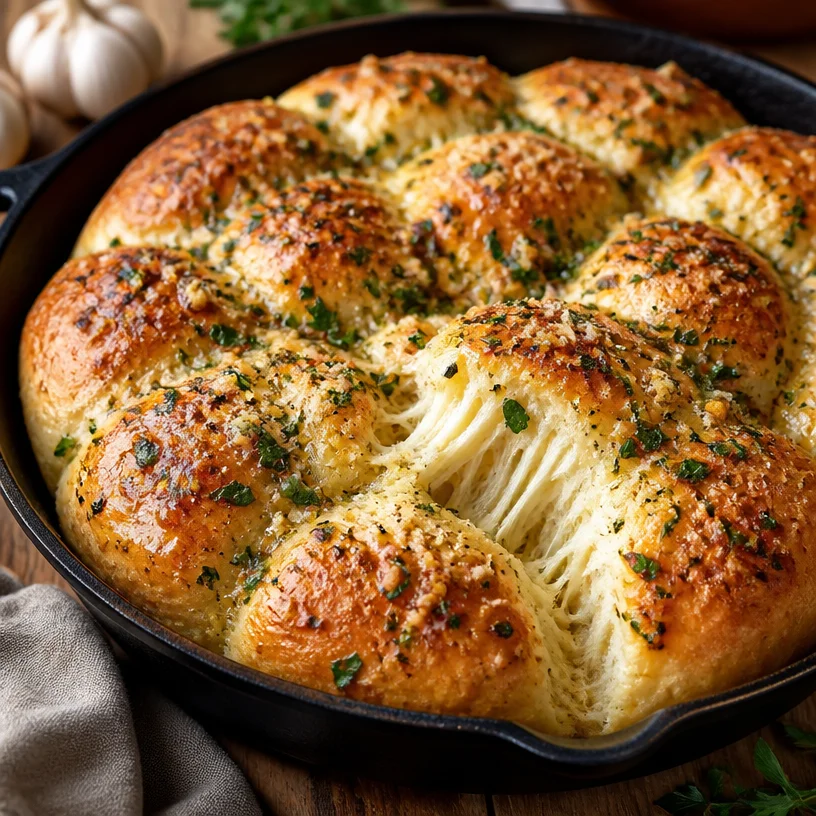
Garlic Herb Bread: A Slice of Nostalgia
Ah, garlic herb bread! Just the thought of it conjures up warm memories of bustling family dinners, cozy gatherings with friends, and the aromatic embrace of freshly baked bread wafting through the kitchen. If you’ve ever walked into a home that’s baking this irresistible treat, you know the magic that fills the air—there’s something undeniably comforting about it. Whether you’re preparing for a special occasion or just craving a cozy night in with a warm loaf, garlic herb bread is your ticket to culinary happiness!
Let’s set the scene: picture this. It’s a rainy afternoon, and I’m at my grandmother’s kitchen, the heart of our family. The kitchen was decorated with vibrant hand-painted tiles, covered with her collection of pristine cookbooks, and, most importantly, there was always something bubbling away on the stovetop or baking in the oven. This was my happy place, and one of the standout moments was when she would whip up her famous garlic herb bread.
She had a knack for taking simple ingredients and creating something extraordinary. I can still remember the way she would generously rub fresh garlic on the crust, her hands deftly kneading the dough as we chatted about our day, and that heavenly scent that danced around us as it baked in the oven. This was more than just bread; it was a lesson in love and simplicity. So, with this recipe, I hope to embody that spirit of nurturing and creativity while bringing a bit of that sweetness into your own kitchen.
So, grab your apron, and let’s bake something unforgettable that celebrates the joy of togetherness and the magic of simple, delicious ingredients!
The Ingredients That Make the Magic Happen
Let’s talk about what you need to make this garlic herb bread. Each ingredient plays a special role, so let’s break it down:
-
Flour (3 cups): The backbone of any bread! All-purpose flour is perfect here. If you’re feeling adventurous, try using bread flour for a chewier texture, or even a mix of whole wheat flour for a nutty flavor.
-
Garlic (4-6 cloves, minced): The star of the show! Fresh garlic gives unbeatable flavor. If you’re in a pinch, you can use garlic powder, but nothing beats fresh. Alternatively, feel free to roast garlic for a sweeter, more mellow flavor.
-
Parsley (1/4 cup, chopped): Fresh parsley adds a burst of color and freshness. If you don’t have parsley, basil or even thyme can bring a new twist to the bread.
-
Oregano (1 teaspoon, dried): This brings a warm, herby depth. If you have fresh oregano, absolutely use that instead, but remember to use a bit more since dried herbs are more concentrated.
-
Butter (1/2 cup, unsalted): Rich and creamy, butter adds flavor and moisture to the bread. For a dairy-free version, coconut oil or vegan butter works brilliantly.
-
Yeast (2 teaspoons, active dry or instant): Yeast is what makes your bread rise and gives it that lovely airy texture. Make sure your yeast is fresh—the last thing you want is a flat loaf!
Let’s Get Baking: Step-by-Step Instructions
Ready to dive into the baking process? Let’s go step-by-step and whip up some delicious garlic herb bread!
-
Activate the Yeast: In a small bowl, combine warm water (about 110°F) and yeast. Let it sit for about 5-10 minutes, until it’s frothy. This means your yeast is alive and ready to work its magic!
-
Mix Dry Ingredients: In a large mixing bowl, whisk together the flour, salt, and dried oregano. This ensures that the salt is evenly distributed, and it gives your dough a great flavor right from the start!
-
Combine Ingredients: Make a well in the center of your flour mixture. Pour in the activated yeast mixture, melted butter, and minced garlic. It’s time to mix! You can do this with a wooden spoon, a spatula, or even your favorite mixing tool. Get your hands in there if you’re feeling adventurous!
-
Add Parsley: Once the dough begins to come together, fold in the chopped parsley. Trust me; this adds a beautiful, fresh flavor that combines perfectly with the garlic.
-
Kneading Time: Transfer the dough to a floured surface and knead for about 7-10 minutes. Don’t worry if it’s a bit sticky at first; just add enough flour as needed to keep it from sticking to your hands and the work surface. A well-kneaded dough should be smooth and elastic—this is key to a wonderful rise!
-
First Rise: Shape your dough into a ball and place it in a lightly greased bowl, covering it with a damp kitchen towel. Let it rise in a warm spot for about 1-2 hours or until it has doubled in size. This is the perfect time to clean up the kitchen or perhaps enjoy a cup of tea!
-
Shape the Dough: Once risen, punch down the dough to release air. Turn it out onto a floured surface. Now, shape it into a loaf or divide it for smaller rolls—whatever your heart desires!
-
Second Rise: Place the shaped dough onto a greased loaf pan or a baking sheet lined with parchment paper. Cover it once more with the damp cloth, and let it rise for another 30-60 minutes.
-
Baking Time! Preheat your oven to 375°F (190°C). Once your dough has risen again, pop it in the oven and bake for about 25-30 minutes, or until the top is golden brown and sounds hollow when tapped. Your home is about to smell like a slice of heaven!
-
Cool and Enjoy: Once out of the oven, let it cool for about 10-15 minutes before slicing. This allows the inside to set, making those beautiful slices even more perfect for serving!
Serving Suggestions: A Feast for the Eyes
Now that you have your delicious garlic herb bread, the next step is all about presentation! For a rustic look, you can serve the bread still warm and whole on a wooden cutting board. Slice it just before serving so the insides stay fluffy and tender. A drizzle of olive oil and a sprinkle of sea salt on top before serving adds an enticing finishing touch.
For a dinner gathering, consider pairing your garlic herb bread with a bowl of hearty soup or a fresh salad. And don’t forget a little dish of herb-infused olive oil for dipping—what a delightful way to indulge!
Recipe Variations: Get Creative in the Kitchen
Baking is all about creativity! Here are some variations you can try with garlic herb bread to keep things exciting:
-
Cheesy Garlic Bread: Add shredded mozzarella or Parmesan cheese to the dough before baking. Melted cheese will create a gooey, indulgent twist!
-
Stuffed Bread: Roll the dough flat and fill it with pesto, cheese, or roasted vegetables. Then roll it up like a cinnamon roll before baking.
-
Spicy Kick: Add crushed red pepper flakes or finely chopped jalapeños to the dough for a bread that packs a punch!
Chef’s Notes: A Dash of Humor and Heart
This garlic herb bread recipe has evolved over time in my kitchen. I’ve played with different herbs, experimented with additional flavors, and every time, it takes me back to that kitchen with my grandmother. One funny story: the first time I attempted this alone, I accidentally added a whole tablespoon of salt instead of a teaspoon! Let’s just say, that loaf was something else—but it taught me to always double-check my measurements (and maybe not bake when you’re distracted!).
This recipe is more than just a collection of steps; it’s about finding joy in the process and the shared experience of baking. When you bake, you’re creating memories, and that’s something truly special!
FAQs and Troubleshooting: Your Kitchen Companion
Have questions? No worries! Here are some common queries when making garlic herb bread:
1. My bread didn’t rise! What happened?
There are a few suspects here! Either the yeast was expired, the water was too hot, or your kitchen was too cold. Make sure your yeast is fresh and activated properly next time!
2. Can I make this bread in advance?
Absolutely! You can prepare the dough, let it rise, and then refrigerate it. Just let it come to room temperature before shaping and proceeding with the second rise.
3. Why did my bread turn out dense?
It could be due to overworking the dough or not letting it rise long enough. Kneading is essential, but remember to be gentle when shaping!
4. Can I use whole wheat flour?
Yes, but it may change the texture a bit. Consider blending it with all-purpose flour to maintain lightness.
Nutritional Information
If you’re curious about nutritional facts, here’s a rough estimate per slice of garlic herb bread (assuming 12 slices in a loaf):
- Calories: 120
- Protein: 3g
- Carbs: 20g
- Fat: 4g
Remember, these values will vary based on the specific ingredients you use!
And there you have it—a heartfelt, handmade garlic herb bread recipe that fills your kitchen with warmth and love. As you create, remember it’s about joy, fun, and making those delicious memories along the way. Happy baking, and may every bite bring a smile to your face!
PrintGarlic Herb Bread
A warm homemade garlic herb bread that brings comfort and nostalgia to any gathering.
- Prep Time: 15 minutes
- Cook Time: 30 minutes
- Total Time: 45 minutes
- Yield: 12 slices 1x
- Category: Bread
- Method: Baking
- Cuisine: Italian
- Diet: Vegetarian
Ingredients
- 3 cups All-purpose flour
- 4–6 cloves Garlic, minced
- 1/4 cup Parsley, chopped
- 1 teaspoon Oregano, dried
- 1/2 cup Unsalted butter, melted
- 2 teaspoons Yeast, active dry or instant
- 1 teaspoon Salt
- 1 cup Warm water (about 110°F)
Instructions
- Activate the yeast by combining warm water and yeast in a small bowl; let sit for 5-10 minutes until frothy.
- Mix the flour, salt, and dried oregano in a large bowl.
- Combine the activated yeast mixture, melted butter, and minced garlic into the well of the flour mixture.
- Add the chopped parsley and fold it into the dough.
- Knead the dough on a floured surface for about 7-10 minutes until smooth and elastic.
- First rise: Place the dough in a greased bowl, cover with a towel, and let it rise for 1-2 hours until doubled in size.
- Shape the dough into a loaf or rolls and place on a greased pan.
- Second rise for 30-60 minutes, covered with a cloth.
- Bake in a preheated oven at 375°F for 25-30 minutes until golden brown.
- Cool for 10-15 minutes before slicing.
Notes
For a cheesy variation, add mozzarella or Parmesan to the dough. Control the salt carefully to prevent over-salting.
Nutrition
- Serving Size: 1 slice
- Calories: 120
- Sugar: 1g
- Sodium: 200mg
- Fat: 4g
- Saturated Fat: 2g
- Unsaturated Fat: 2g
- Trans Fat: 0g
- Carbohydrates: 20g
- Fiber: 1g
- Protein: 3g
- Cholesterol: 15mg
Keywords: garlic bread, herb bread, homemade bread, comfort food