A Taste of Adventure: Whipping Up a Huckleberry Crisp
Hey there, fellow food lovers! Welcome back to my kitchen haven here at Sprinkle Spoon! Today, I’m excited to take you on a culinary adventure, one that celebrates not only vibrant flavors but also a dash of nostalgia. We’re diving into the world of baking with a delightful Huckleberry Crisp. It’s a dish that sings of the sweet summer days spent picking berries and sharing stories over warm desserts.
Introduction: The Joy of Huckleberry Crisp
Ah, the huckleberry! What’s not to adore about these tiny bursts of flavor? With their rich history and unique taste, huckleberries are true treasures of the wild. These little gems remind me of lazy afternoons spent in the hills, where my family and I would scour the bushes, excitedly plucking the small blue orbs to fill our baskets. Each berry carries a sprinkle of adventure, and when transformed into a huckleberry crisp, they become a nostalgic masterpiece that sings to the heart.
This Huckleberry Crisp is more than just a dessert; it represents cherished memories and the magic of gathering with loved ones. Picture this: you’ve just returned from a day of berry picking, the sun is setting, and the air is filled with a sweet, slightly tangy aroma as you prepare to whip up something delicious. As you mix, bake, and sprinkle, the warm aroma wafts through your home, enveloping everyone in a comforting embrace that says, "It’s time for dessert!"
Imagine sliding that crispy, golden-brown topping over those luscious, juicy huckleberries, invoking those sweet memories with every bite. Topped with a scoop of vanilla ice cream? Pure magic! So, whether you’re reminiscing about your own berry-picking adventures or simply looking to indulge in a sweet treat, this huckleberry crisp is sure to lighten your mood and warm your spirit.
Personal Story: A Family Tradition
I can’t help but smile when I think back to those sunny days of family berry picking. My grandmother would lead the way, her vibrant sun hat perched jauntily atop her head and a basket swinging by her side. We would laugh and chatter as we wandered through the underbrush—my little hands picking and popping huckleberries into my mouth faster than I could fill my basket.
It was during those outings that my love for cooking blossomed. My grandmother would always remind me to save enough for our legendary Huckleberry Crisp, which was the cornerstone of our family gatherings. The crispy, buttery topping was her secret, and I can still hear her soft chuckle as she shared her tips while we mixed up the batter together. She always said that cooking is about love and joy—infusing the mundane with a sprinkle of magic.
Those cherished moments in the kitchen were just as joyful as the ones outdoors, and they inspired my passion for creating fun, flavorful dishes that bring people together. That’s the beauty of the Huckleberry Crisp: it’s not just about the dessert; it’s about sharing joy, laughter, and warmth with family and friends.
Ingredients: Let’s Gather Our Goodies!
Now that we have set the stage with some sweet nostalgia, let’s get into the nitty-gritty of this delicious Huckleberry Crisp! Here’s what you’ll need to create this delightful dish:
-
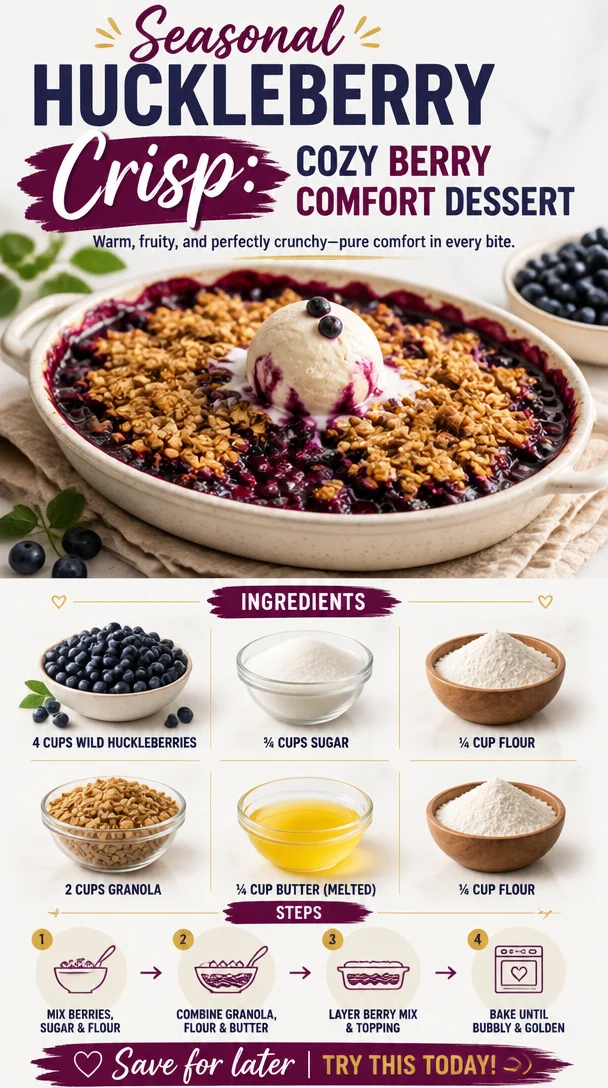
4 cups wild huckleberries
Wild huckleberries are the essence of this crisp. Their tartness beautifully balances the sweetness of the topping. If you can’t find wild huckleberries, feel free to replace them with blueberries or blackberries—they’ll work just as well! -
¾ cup sugar
Sugar adds that needed sweetness to our huckleberries. Depending on your preferences, you can use less if you like a tart dessert or substitute with honey or maple syrup for a natural twist. -
¼ cup flour
A touch of flour helps to thicken the berry mixture, ensuring that it doesn’t become too runny. You can use all-purpose flour or swap in a gluten-free alternative if needed. -
2 cups granola
This is where the magic happens! Granola adds crunch and texture to our topping. Feel free to experiment with your favorite variety or even make your own for a truly personalized touch! -
¼ cup butter (melted)
Melted butter is the glue that binds the topping together, lending richness and a delectable golden color. You can substitute with coconut oil or a non-dairy butter for a dairy-free version. -
¼ cup flour (for topping)
A little extra flour in the topping helps create a perfect crumble. Just like the filling, you can opt for all-purpose flour or a gluten-free alternative.
Step-by-Step Instructions: Let’s Get Cooking!
Alright, foodies! It’s time to roll up our sleeves and dive into the baking process! Here’s how to whip up your Huckleberry Crisp step by step:
-
Preheat Your Oven
Preheat your oven to 350°F (175°C). It’s essential to get that oven nice and hot to achieve a perfectly crispy topping. -
Prepare the Huckleberries
In a large mixing bowl, combine the huckleberries, ¾ cup of sugar, and ¼ cup of flour. Gently toss everything together until the berries are well coated. This step helps to enhance their flavor and thickens that delightful juice while baking. Let the mixture sit for about 10-15 minutes.Chef’s hack: If you’re using fresh huckleberries, rinse them gently in cold water beforehand to remove any debris. If they’re frozen, don’t worry! Just toss them directly into the mixture without thawing.
-
Create the Crunchy Topping
In another bowl, mix together the granola, melted butter, and ¼ cup of flour. Use your fingers or a fork to incorporate everything until you have a crumbly texture. The combination of the granola and flour creates a delicious topping that’ll have everyone asking for seconds!Pro tip: If you’re feeling adventurous, consider adding a pinch of cinnamon or nutmeg for an extra layer of flavor. The warm spices beautifully complement the huckleberries!
-
Assemble the Crisp
Spread the huckleberry mixture evenly in a greased baking dish. Then, sprinkle the crunchy topping generously over the berries. This way, every bite will be bursting with flavor and texture! -
Bake it to Perfection
Pop your assembled huckleberry crisp into the preheated oven and bake for about 30-35 minutes, or until the topping is golden brown and the huckleberries are bubbling. This is the moment when your kitchen will be filled with that unforgettable aroma!Baking tip: If you notice that the topping is browning too quickly but the berries are not quite done, cover it loosely with aluminum foil and continue baking until fully cooked through.
-
Cool and Serve
Once baked, remove the dish from the oven and allow your huckleberry crisp to cool for about 10-15 minutes. This will help the bubbling juices to set up a bit!Presentation tip: For that Instagram-worthy dessert, serve it warm in bowls topped with a scoop of vanilla ice cream or a dollop of whipped cream. Don’t forget some extra huckleberries for color!
Serving Suggestions: Plating Your Delight
This Huckleberry Crisp is a showstopper on its own, but let’s elevate it even further! Serve it warm in a charming bowl with a generous scoop of vanilla ice cream melting into the crispy topping. A little sprinkle of huckleberries and a fresh mint leaf for garnish will make it stunning! Feel free to enjoy it solo or delight your guests by presenting it family-style in the baking dish with spoons ready for digging in.
Recipe Variations: Creative Twists
-
Citrus Zing: Add a zest of lemon or orange to the huckleberry mixture for a vibrant citrus surprise that elevates the flavor profile!
-
Nutty Crunch: Throw in some chopped nuts like almonds or pecans into your topping for an added crunch that pairs beautifully with the berries.
-
Spiced Affair: Toss in some cinnamon or even ginger to the huckleberry filling for a warm, cozy touch.
-
Berry Medley: Combine huckleberries with raspberries or strawberries for a mixed berry crisp that adds a pop of color and explosion of flavors.
-
Oatmeal Swap: Replace granola with rolled oats for a heartier topping. Simply combine oats with a bit of brown sugar and cinnamon for a lovely twist!
Chef’s Notes: A Golden Legacy
As I reflect on this recipes’ journey, I can’t help but laugh at my first attempts. I vividly remember the first time my grandmother let me take the lead. The topping turned out more like a brick than a crumbly delight. But hey—life’s about trial and error! With practice (and plenty of patience), I learned that cooking is—as I now say—part art, part science, and all love!
Over the years, I’ve tweaked my grandmother’s original recipe, infusing bits of my own culinary explorations. This recipe has evolved as I swapped traditional ingredients for healthier alternatives or experimented with unexpected flavor combinations. But at its heart, every batch still pays homage to those sun-drenched days in the wild and my grandmother who taught me the joy of cooking from the heart.
FAQs and Troubleshooting
Q: Can I use frozen huckleberries?
Absolutely! Frozen huckleberries work perfectly in this recipe. Just throw them in without thawing, and it’ll take a bit longer for the crisp to bake, but the flavor will be just as delightful!
Q: How can I tell when the crisp is done?
Look for a golden-brown topping and bubbling juices around the edges. It should be aromatic, and if you press down slightly, you should see the berry mixture swirl with that sweet nectar.
Q: Can I make this ahead of time?
Yes, you can prepare everything ahead of time! Assemble the huckleberry mixture and topping, then cover and refrigerate. Bake it fresh just before serving for the best taste and texture!
Q: Is there a vegan version?
Certainly! Substitute butter with coconut oil or vegan butter, and use a flax egg in place of any eggs if included in your recipe variations. The crisp will still be scrumptious!
Nutritional Info
While I haven’t included specific nutritional values for this delightful Huckleberry Crisp, generally speaking, it’s a wonderful blend of simple ingredients providing fiber and antioxidants from the huckleberries and healthy grains from granola. As always, enjoy in moderation—because life is too short for anything less than delightful desserts!
And there you have it! A lovely, warm, and scrumptious Huckleberry Crisp recipe infused with joy and memories. I can’t wait for you to gather your ingredients and let those huckleberries shine! Remember, every dish tells a story—what will yours be? Happy baking, my friends!
PrintHuckleberry Crisp
A delightful huckleberry crisp that celebrates sweet summer days and cherished family memories.
- Prep Time: 15 minutes
- Cook Time: 35 minutes
- Total Time: 50 minutes
- Yield: 8 servings 1x
- Category: Dessert
- Method: Baking
- Cuisine: American
- Diet: Vegetarian
Ingredients
- 4 cups wild huckleberries
- ¾ cup sugar
- ¼ cup flour
- 2 cups granola
- ¼ cup butter (melted)
- ¼ cup flour (for topping)
Instructions
- Preheat your oven to 350°F (175°C).
- Combine the huckleberries, ¾ cup of sugar, and ¼ cup of flour in a large mixing bowl; gently toss together.
- Let the mixture sit for about 10-15 minutes.
- Mix the granola, melted butter, and ¼ cup of flour in another bowl until crumbly.
- Spread the huckleberry mixture evenly in a greased baking dish, and sprinkle the crunchy topping over the berries.
- Bake for about 30-35 minutes, or until the topping is golden brown and the huckleberries are bubbling.
- Cool for about 10-15 minutes before serving.
Notes
Serve warm with vanilla ice cream and extra huckleberries for garnish. Experiment with nuts or spices for added flavor!
Nutrition
- Serving Size: 1 serving
- Calories: 300
- Sugar: 15g
- Sodium: 160mg
- Fat: 10g
- Saturated Fat: 6g
- Unsaturated Fat: 4g
- Trans Fat: 0g
- Carbohydrates: 45g
- Fiber: 5g
- Protein: 4g
- Cholesterol: 20mg
Keywords: huckleberry crisp, dessert, summer recipe, baking, family recipe