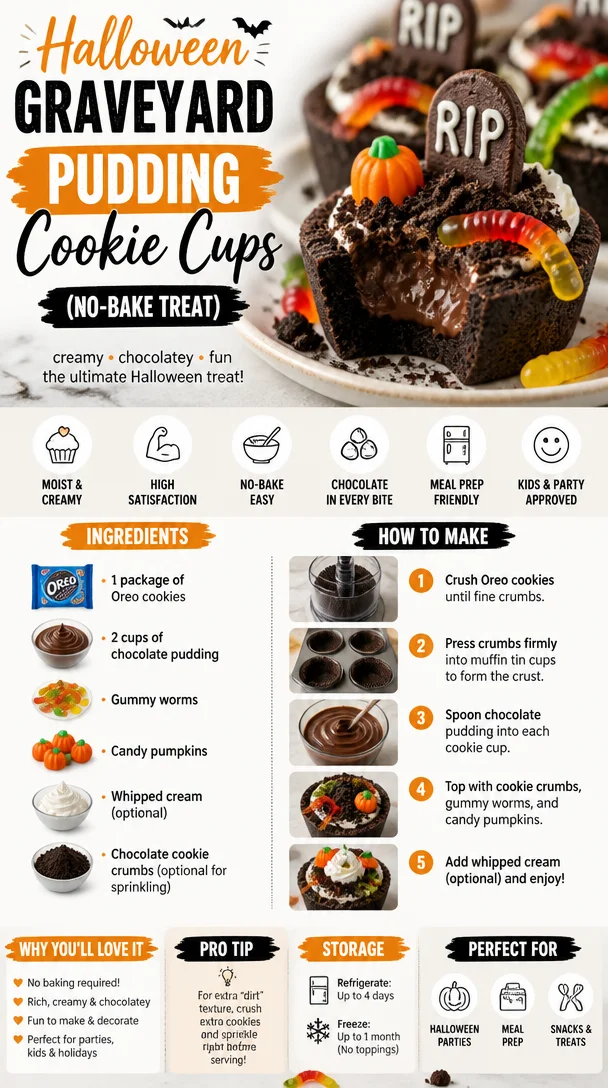
Graveyard Pudding Cookie Cups: A Spooktacular Treat for Halloween!
As the leaves turn golden and the air becomes crisp, we know that Halloween is right around the corner! It’s that magical time of year when the world transforms into a spookier place, filled with ghosts, ghouls, and of course—delicious treats! One of my absolute favorite Halloween creations growing up was Graveyard Pudding Cookie Cups. Not only are they an easy no-bake dessert, but they also bring out my inner child and allow me to indulge in the festive spirit!
Picture this: miniature cups filled with velvety chocolate pudding, crushed Oreo cookies sprinkled on top to resemble fresh soil, and exaggerated gummy worms writhing around like little monsters preparing for a spooky crawl. And, let’s not forget those adorable candy pumpkins peeking through! Each bite is a delightful combination of textures and flavors that will make this Halloween dessert a hit at any gathering.
Whether you’re hosting a spirit-themed party, looking for a fun treat to make with the kids, or simply want to enjoy a little festive fun in your kitchen, these Graveyard Pudding Cookie Cups are perfect for you! So grab your favorite mixing spoon, and let’s whip up something that’s not just delicious but also filled with playful whimsy!
A Trip Down Memory Lane: Halloween Nostalgia
Growing up, Halloween was a holiday filled with excitement and creativity. Each year, my family transformed our home into a haunted house, complete with eerie decorations, flickering lights, and, of course, a table full of terrifyingly delightful treats. Among the eerie delights, my favorite was always the Graveyard Pudding Cookie Cups.
I remember one particular Halloween when my younger sibling and I decided to take on the dessert-making challenge together. With our Halloween costumes on—me dressed as a witch and my sibling as a ghost—we turned the kitchen into our little laboratory of spookiness. We poured, crushed, and layered our ingredients with more giggles than precision, and it was the perfect blend of chaos and culinary creativity.
We had the best time assembling the cups, getting covered in chocolate pudding, and arguing over who got to place the gummy worms, and I can’t forget the outburst of laughter when we accidentally dropped a handful of gummy worms on the floor and our dog got to them first! Those moments of joy and camaraderie are what I aim to capture with my Graveyard Pudding Cookie Cups. It’s not just about the dessert; it’s about the memories we create around them.
Ingredients
Here’s what you’ll need to make these fun and spooky Graveyard Pudding Cookie Cups:
-
1 package of Oreo cookies
These classic cookies are perfect for the "dirt" layer on top of the pudding. If you want a gluten-free version, use gluten-free chocolate sandwich cookies! -
2 cups of chocolate pudding
Whether you go for instant pudding mix or make it from scratch, chocolate pudding is an undeniable classic. For a unique twist, feel free to try vanilla pudding or even butterscotch for a different flavor base! -
Gummy worms
The quintessential Halloween candy! They add a fun and spooky touch when peeking out of the “dirt.” If you want a different theme, try candy eyes or marshmallow ghosts instead. -
Candy pumpkins
These little treats add color and charm, giving life to your graveyard scene. You can use other seasonal candies like candy corns or even chocolate mini bats if you’re feeling adventurous! -
Whipped cream (optional)
Light and fluffy, a dollop of whipped cream can take your cookie cups to another level. If you’re aiming for a dairy-free option, try coconut whipped cream! -
Chocolate cookie crumbs (optional for sprinkling)
These make for even more "dirt" on top! For a spookier flavor, consider using crushed chocolate graham crackers.
Step-by-Step Instructions
Alright, time to roll up your sleeves and get into the fun part! Follow these simple steps to create your Graveyard Pudding Cookie Cups:
-
Prepare Your Ingredients: First things first, gather all your ingredients and tools. You’ll need cups or small glasses, a mixing bowl and a spoon, and a food processor or a zip-top bag for crushing the Oreos (this can be a great way to get the kids involved!).
-
Crush the Oreos: Place your Oreo cookies in a food processor and pulse until they resemble fine crumbs. If you don’t have a processor, put the cookies into a zip-top bag and crush them with a rolling pin or your hands. Pro tip: Leave some larger chunks for extra texture! Set aside a small portion of this mixture for garnishing later.
-
Prepare the Pudding: If you’re using instant pudding mix, follow the package instructions for making two cups of pudding. Generally, that means mixing it with two cups of cold milk and whisking for about 2 minutes until it thickens. If you’re making it from scratch, that’s fantastic! Just ensure it’s made in advance and chilled.
-
Layer the Cups: Start layering your cups by adding a generous spoonful of chocolate pudding to the bottom of each cup. Follow up with a layer of crushed Oreos to create the "dirt." Repeat this process until you reach the top of your cups. Aim for at least two or three layers—you want a rustic graveyard look!
-
Adding the Finishing Touches: Now, for the real fun! Top each cup with a dollop of whipped cream to create a lovely, cloud-like effect. Use the reserved Oreo crumbs to sprinkle on top, making it look extra realistic and spooky.
-
Garnish with Candies: Strategically place your gummy worms crawling out of the pudding and top it off with a few colorful candy pumpkins. You can also get creative with positioning them—as if they’re crawling out from their buried treasures!
-
Chill and Serve: Let your spooky creations chill in the refrigerator for at least 30 minutes before serving. This helps the flavors meld together and makes for a cool, refreshing treat.
Serving Suggestions
These Graveyard Pudding Cookie Cups are not just visually appealing, but they also taste amazing! For serving, place them on a spooky-themed platter or use Halloween-themed napkins to kick up the atmosphere a notch. You can also personalize cups with little name tags; for example, "Wormy Delight" or "Pumpkin Patch Surprise." Trust me, the more festive you make it, the more enjoyable (and memorable) the experience becomes!
Recipe Variations
-
Mini Pumpkin Spice Graveyards: Use pumpkin-flavored pudding and layer with crushed ginger snap cookies for a delicious twist celebrating the pumpkin season.
-
Peanut Butter Bliss Cups: Blend in some peanut butter with your chocolate pudding for a rich flavor experience. Top with crushed Butterfinger or Reese’s pieces instead of candy pumpkins for another layer of nostalgia!
-
Vegan Delight: Make the pudding using almond or oat milk and top with dairy-free whipped cream. Use dairy-free chocolate sandwich cookies to keep it all plant-based.
-
Spooky Red Velvet: Instead of chocolate pudding, use red velvet cake layers along with cream cheese frosting for a rich, flavorful alternative. Sprinkle with cocoa powder instead of where you’d use crushed Oreos for that ‘dirt’ effect.
-
The Haunted Graveyard: Add tiny cupcake toppers, ghostly marshmallows, or edible glitter to your cups for an added whimsical touch!
Chef’s Notes
I absolutely love how versatile this recipe can be! It’s a fantastic canvas for all of your creative ideas. One Halloween, I even threw in some pop rocks into the mix for a bit of whimsy. Every time you bit into the cup, they would pop and crackle, creating a fun experience for everyone!
Whenever I make these, I can’t help but smile at the memories of getting messy in the kitchen, and I encourage you to embrace that same spirit! Embrace chaos—after all, the best kitchen moments happen when you least expect them.
FAQs and Troubleshooting
-
Can I make these ahead of time?
Absolutely! You can prepare them a day in advance. Just ensure you keep them stored in the refrigerator until you’re ready to serve to keep everything fresh. -
What can I do if my pudding isn’t thickening?
If the pudding isn’t setting, ensure you’re mixing it for the right amount of time as per the package instructions. Adding a bit more time of whisking can often help; just don’t overdo it! -
How do I prevent the Oreos from getting soggy?
Layer the Oreos on top of the pudding rather than mixing them in! This keeps them crunchy and adds texture with every spoonful. -
What should I do with leftover ingredients?
If you have leftover pudding or Oreos, you can just enjoy them on their own! Alternatively, get creative and make more cups or even use them in another dessert, like trifle.
Nutritional Info
While I focus on joy and creativity rather than strict nutritional details, these Graveyard Pudding Cookie Cups can certainly be made with care for dietary needs and preferences. With these spooky delights, the idea is to fun and indulgent treats that spark joy, so feel free to adapt to your heart’s desire!
So there you have it, my spooky friends! Graveyard Pudding Cookie Cups that bring sweetness—and a sprinkle of whimsy—to your Halloween festivities. No tricks, just a tasty treat waiting to be devoured. Now, put on your apron, get your hands a little messy, and let’s create those unforgettable moments together! 🍬💀👻
PrintGraveyard Pudding Cookie Cups

These fun and spooky Graveyard Pudding Cookie Cups are a delightful Halloween treat filled with chocolate pudding, crushed Oreos, gummy worms, and candy pumpkins.
- Prep Time: 15 minutes
- Cook Time: 0 minutes
- Total Time: 30 minutes
- Yield: 4 servings 1x
- Category: Dessert
- Method: No-Bake
- Cuisine: American
- Diet: Vegetarian
Ingredients
- 1 package of Oreo cookies
- 2 cups of chocolate pudding
- Gummy worms
- Candy pumpkins
- Whipped cream (optional)
- Chocolate cookie crumbs (optional for sprinkling)
Instructions
- Prepare your ingredients: Gather all your ingredients and tools, including cups or small glasses.
- Crush the Oreos: Pulse Oreo cookies in a food processor until fine crumbs or crush them in a zip-top bag.
- Prepare the pudding: Follow package instructions to make chocolate pudding or prepare it from scratch.
- Layer the cups: Add a generous spoonful of pudding to each cup, followed by a layer of crushed Oreos, and repeat.
- Add the finishing touches: Top with whipped cream and sprinkle with reserved Oreo crumbs.
- Garnish with candies: Place gummy worms and candy pumpkins on top for decoration.
- Chill and serve: Refrigerate for at least 30 minutes before serving.
Notes
These cups can be prepared a day in advance and stored in the refrigerator until ready to serve.
Nutrition
- Serving Size: 1 cup
- Calories: 250
- Sugar: 20g
- Sodium: 200mg
- Fat: 10g
- Saturated Fat: 3g
- Unsaturated Fat: 5g
- Trans Fat: 0g
- Carbohydrates: 35g
- Fiber: 1g
- Protein: 3g
- Cholesterol: 5mg
Keywords: Halloween, dessert, spooky treats, no-bake desserts, pudding cups