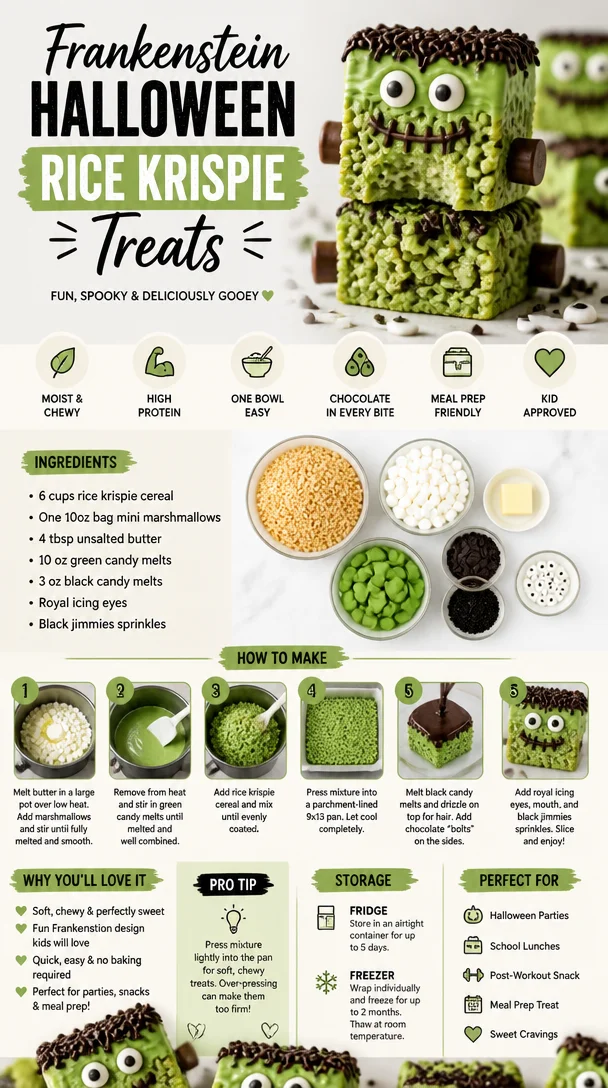
Frankenstein Halloween Rice Krispie Treats: A Spooktacular Treat
Hello, fellow food adventurers! It’s Halloween time, and you know what that means—it’s the perfect moment to whip up some fun, spooky delights that will charm both kids and adults alike! Get ready to treat yourself to a special recipe that’s not only oh-so-delicious but also jam-packed with personality: Frankenstein Halloween Rice Krispie Treats!
Picture this: you’re gathered with friends, the sun has set, and a cool autumn breeze is blowing outside. The air is filled with the delightful scent of sweet treats, laughter, and maybe a little bit of mischief. That’s the kind of atmosphere I aim to create with my recipes, and these Rice Krispie treats are no exception. These green little monsters will bring a smile to anyone’s face—and let’s be real, who doesn’t love a gooey, crispy, and slightly spooky dessert?
Making Rice Krispie treats is like a trip down memory lane for me. I remember coming home from school, my backpack slung over one shoulder, and my first stop would inevitably be the kitchen. My mom always had a pot of melted marshmallows bubbling away, and the smell alone was enough to make you feel at home. After a hot day of classes, there was nothing better than rolling up my sleeves and mixing that gooey goodness with Rice Krispies with a sprinkle of love. Every bite brings a familiar sense of comfort and joy, and that’s precisely what I want to channel with these Frankenstein treats.
So, let’s hop right into the kitchen and get started on these adorable mummified Frankenstein Rice Krispie treats! You may want to have your camera ready because these are going to be as photogenic as they are delicious!
Ingredients
Here’s what you’ll need to conjure up your very own Frankenstein Halloween Rice Krispie Treats:
-
6 cups Rice Krispie cereal
The base of our treats! Light and crispy, this cereal creates the perfect texture. If you’re looking for a gluten-free option, you can swap it for gluten-free puffed rice cereal. -
One 10oz bag mini marshmallows
Liquid gold in the form of marshmallows! They melt down beautifully and bind the cereal together. Have a vegan household? You can use vegan marshmallows instead! -
4 tbsp unsalted butter
Adds richness and creates that dreamy, gooey texture we all love. You can substitute with coconut oil for a dairy-free alternative. -
10 oz green candy melts
These vibrant melts give our little monsters their spooky hue! If you can’t find green, just grab white ones and tint them with a touch of green food coloring. -
3 oz black candy melts
Perfect for adding details like mouths and hair. You could also use dark chocolate if you prefer a chocolatey twist! -
Royal icing eyes
These little cuties add personality! You can find them at baking supply stores or use mini chocolate chips or even edible googly eyes as a fun alternative. -
Black jimmies sprinkles
For creating texture and dimension—because what’s a Frankenstein without a little sprinkle flair? You could swap these for any colored sprinkles if you don’t have black on hand.
Step-by-Step Instructions
Step 1: Melting the Butter and Marshmallows
Start by grabbing a large saucepan and melting the 4 tablespoons of unsalted butter over medium heat. As the butter begins to melt, throw in the 10 oz of mini marshmallows. Stir constantly until everything is melted and smooth, resembling a fluffy cloud of sweetness. Chef Tip: Be patient here! If you let the marshmallows sit too long, they could burn, and nobody wants that.
Step 2: Mixing in the Rice Krispies
Once the marshmallows are smooth and silky, remove the pan from the heat. Quickly add in the 6 cups of Rice Krispie cereal, stirring until all the lovely crispy bits are fully coated. It should look like a delightful, gooey mess! Be sure to scrape the sides of the pan well. Chef Hack: Use a greased spatula or even slightly wet your hands to help prevent sticking as you mix it all together!
Step 3: Shaping the Treats
Once fully combined, transfer the mixture into a greased 9×13 inch baking dish. Pat it down gently, using your greased hands or spatula to even out the top. Take care not to over-compress, or your treats could become too hard. Chef’s Insight: Let’s be real, everyone loves those crispy edges, so touch them as little as possible!
Step 4: Melting the Candy Coatings
In two separate microwave-safe bowls, melt the 10 oz of green candy melts in one bowl and 3 oz of black candy melts in the other. Heat in 30-second increments, stirring well until smooth. Be cautious not to overheat, or you could end up with a tricky clumpy mess!
Step 5: Decorating the Treats
Once your crispy treats have cooled (about 30-40 minutes), cut them into squares or rectangles to resemble Frankenstein heads. Dip the top of each treat into the melted green candy coating, allowing excess to drip off. You can use a fork to help with this!
Now for the fun part! Use a piping bag (or a ziplock bag with the corner snipped off) to drizzle on the black candy melts to create mouths and hair. While the chocolate is still wet, place those adorable royal icing eyes on your Frankenstein creations. To add an extra spooky touch, sprinkle some black jimmies sprinkles over the top for texture and flair!
Step 6: Letting it Set
Place your finished treats on wax paper or a cooling rack to allow the candy melts to fully set. Patience really is a virtue here. It’s hard to resist the temptation to dig in right away, but trust me—it’s worth the wait!
Serving Suggestions
Once your Frankenstein Rice Krispie Treats are all set, arrange them on a platter like they’re attending a monster mash ball! You could even place them in cute little treat bags tied with orange ribbons if you’re hosting a Halloween party. Add a few faux spider webs or decorative pumpkins around for that extra festive touch! 🍬🎃
Recipe Variations
Here are a few fun twists you can try to keep things interesting:
-
Monster Mix: Toss in some edible candies or gummies into your Rice Krispie mix before shaping for a flavor and texture explosion!
-
Vegan Variation: Use vegan butter and marshmallows for a delightful treat that everyone can enjoy.
-
Chocolate Version: For chocolate lovers, swap half of the Rice Krispies with cocoa crisps for a chocolatey surprise.
-
Peanut Butter Bliss: Add 1/2 cup of creamy peanut butter to your melted marshmallow mix for a nutty twist that’s totally to die for!
-
Spooky Eyes: Instead of using royal icing eyes, use gummy eyeballs or white chocolate melts with mini chocolate chips for a different look!
Chef’s Notes
Every time I make these Frankenstein treats, it never fails to bring a glint of joy to my heart. I used to make Rice Krispie treats with my little sister during Halloween, and we would cover our hands in melted marshmallow—what a sticky adventure! Over the years, we’ve continued to create quirky variations, but these little monster faces always bring the best reactions. Don’t be surprised if you end up making a few extra just for yourself!
FAQs and Troubleshooting
Q1: My Rice Krispie treats turned out too hard. What went wrong?
This usually happens if they were packed too tightly in the pan or cooked too long. Be gentle while pressing them into the pan and keep an eye on those marshmallows to avoid burning.
Q2: Can I make these in advance?
Absolutely! Just store them in an airtight container at room temperature. They’ll stay fresh for 3-5 days. If they last that long!
Q3: What if my candy melts are too thick?
If that happens, you can thin them out with a teaspoon of coconut oil or shortening. Just melt it together with the candy melts until you get the desired consistency.
Q4: How do I store leftovers?
Place your Frankensteins in a sealed container. They do have a tendency to get a bit sticky, so use wax paper between layers for the best protection!
Now you’re all set to make some festive treats that enliven any Halloween gathering with their charm and flavor! Dive into the kitchen and embrace the spirit of the season, and don’t forget to sprinkle a little fun along the way. Happy Halloween, friends! 🎉👻
PrintFrankenstein Halloween Rice Krispie Treats

Spooky and delicious Rice Krispie treats shaped like Frankenstein heads, perfect for Halloween gatherings.
- Prep Time: 15 minutes
- Cook Time: 10 minutes
- Total Time: 25 minutes
- Yield: 12 servings 1x
- Category: Dessert
- Method: Baking
- Cuisine: American
- Diet: Vegetarian
Ingredients
- 6 cups Rice Krispie cereal
- 10 oz mini marshmallows
- 4 tbsp unsalted butter
- 10 oz green candy melts
- 3 oz black candy melts
- Royal icing eyes
- Black jimmies sprinkles
Instructions
- Start by grabbing a large saucepan and melting the butter over medium heat. Add the mini marshmallows and stir constantly until smooth.
- Once the marshmallows are smooth and silky, remove from heat and add the Rice Krispie cereal, stirring until fully coated.
- Transfer the mixture into a greased 9×13 inch baking dish, patting it down gently to avoid over-compressing.
- Melt the green candy melts in one bowl and black candy melts in another, heating in 30-second increments until smooth.
- Cut the cooled treats into squares or rectangles, dip the tops into green candy coating, letting excess drip off.
- Use a piping bag to drizzle the black candy melts for mouth and hair, and place royal icing eyes on top. Finish with black jimmies sprinkles.
- Allow the treats to set on wax paper or a cooling rack before serving.
Notes
Store leftovers in an airtight container at room temperature. They’ll stay fresh for 3-5 days.
Nutrition
- Serving Size: 1 treat
- Calories: 150
- Sugar: 20g
- Sodium: 90mg
- Fat: 5g
- Saturated Fat: 3g
- Unsaturated Fat: 2g
- Trans Fat: 0g
- Carbohydrates: 25g
- Fiber: 0g
- Protein: 1g
- Cholesterol: 10mg
Keywords: Halloween, Rice Krispie Treats, Frankenstein, spooky dessert, kids treats