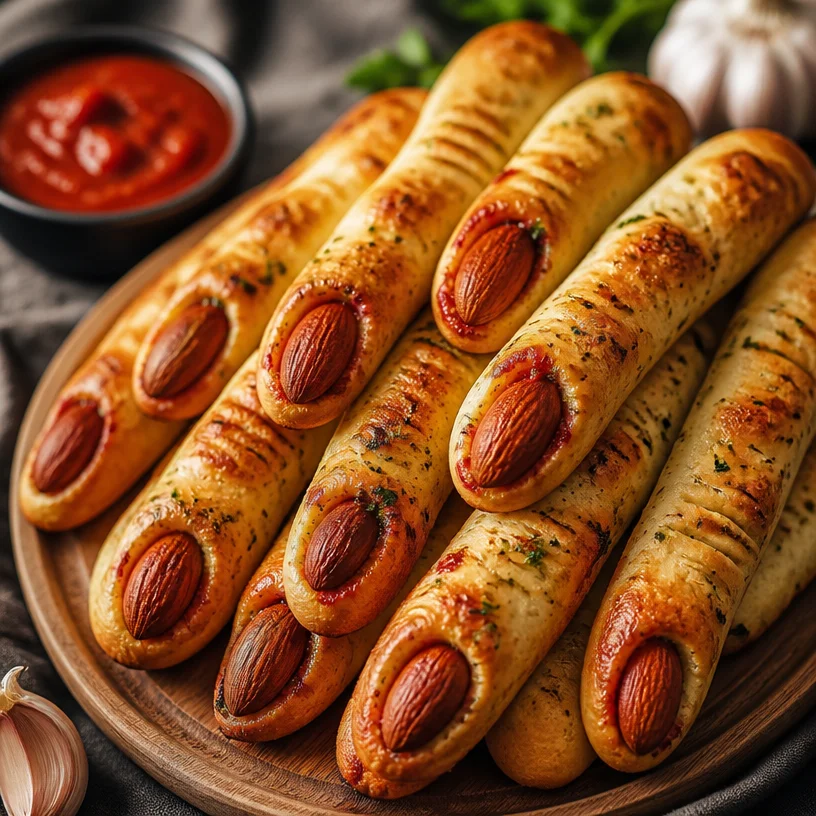
Spooktacular Treats: How to Make Witch Finger Breadsticks
As the leaves start to turn and the air gets crisp, it’s time for one of my favorite seasons—Halloween! It’s a time for costumes, parties, and, most importantly, deliciously fun food that brings a hint of spookiness and a whole lot of flavor to the table. One treat that always raises the hair on the back of my neck (in a good way!) is my Witch Finger Breadsticks. With their eerie appearance and delightful taste, these breadsticks are sure to enchant both kids and adults alike.
Imagine this: a gathering of friends around the table, laughter bubbling over as you dip these creepy finger-shaped treats into your favorite marinara sauce. As you take a bite, the garlic butter seeps through the soft, warm dough, and the crunch of the almond "nails" gives that satisfying snap! They are easy to whip up, completely customizable, and make for the perfect addition to any Halloween spread. So grab your apron, and let’s conjure up some delicious Witch Finger Breadsticks that are more fun than fright!
A Recipe Rooted in Memories
Every Halloween, I recall sitting at my grandmother’s kitchen table, eagerly awaiting the moment when we’d surprise everyone at the party with some creative concoction. One particular Halloween stands out: we decided to make “witch fingers” just like my favorite storybook characters. I remember the flour clouding up the kitchen as we mixed and shaped the dough, and how my grandma would cackle with delight when we presented our spooky treats. Not only were the Witch Finger Breadsticks a hit, but they also pulled family and friends together for a memorable feast of fun.
As an adult, I’ve kept that familial tradition alive, and I love being able to share it with all of you. It’s more than just a recipe; it’s a celebration of creativity in the kitchen—making spooky food that feels a little magical.
What You’ll Need: Ingredients
Here’s what you need to create these Witch Finger Breadsticks, along with some chef insights to make your baking experience even smoother:
-
Pizza Dough:
- This is the base of our fingers! You can either make your own dough or grab some from the store. If you’re short on time, feel free to use pre-made dough—no judgment here!
-
Almonds:
- These will serve as the "nails" of our witch fingers. Blanched almonds are perfect for this, but you can also use whole pecans or even candy corn if you’d like a sweet twist!
-
Garlic Butter:
- This deliciously rich blend will add flavor and help give the breadsticks that golden-brown finish. You can easily make your own by melting butter and mixing in minced garlic and a touch of parsley.
Step-by-Step Instructions: Crafting Your Witch Finger Breadsticks
Now that we have our ingredients, let’s get to the fun part! Here’s how to transform those simple ingredients into spooky breadsticks:
-
Preheat the oven: Start by preheating your oven to 375°F (190°C). This way, it’ll be all warm and ready for our finger creations!
-
Prepare your pizza dough: If you’re using store-bought pizza dough, place it on a lightly floured surface and let it rest for about 15 minutes. This will make it easier to shape. Don’t have any dough? No worries! You can make a simple homemade dough with flour, water, yeast, and a sprinkle of salt.
-
Divide the dough: Cut the dough into strips about 6-8 inches long and roughly ½ inch wide. This size is perfect because it gives the breadsticks enough room to puff up in the oven while still resembling fingers. It’s like shaping your own little dough monster, so let your imagination run wild!
-
Shape the fingers: Take each strip of dough and roll it in your hands to create a finger-like shape. The trick is to make one end slightly thinner than the other for the fingertip.
-
Create the nail bed: Here’s where the magic happens! Pinch one end of each shaped finger to form the nail bed, and then press an almond (or your chosen “nail”) into the tip. This part is best done gently so the almond stays put without tearing the dough apart.
-
Brush on the garlic butter: Melt some butter in a small bowl and mix in a couple of minced garlic cloves and a pinch of salt. Using a pastry brush or simply a spoon, glaze those little fingers generously, making sure to catch any nooks and crannies. The garlic butter adds amazing flavor and gets that beautiful golden color while baking.
-
Bake the breadsticks: Place your witch fingers on a baking sheet lined with parchment paper. Bake for about 15-20 minutes or until they turn a lovely golden brown. Keep an eye on them as baking times can vary depending on your oven.
-
Cool and serve: Once out of the oven, let those eerie fingers cool for a couple of minutes before serving. They are meant to be enjoyed fresh and warm!
Serving Suggestions: Plating Your Spooky Treats
When it comes to serving your Witch Finger Breadsticks, presentation is key! Arrange the breadsticks on a fun platter, perhaps with a pumpkin or spider web decor to really set the Halloween mood. Pair them with a side of marinara sauce or your favorite dipping sauce for some extra fun. They make for a great appetizer or snack, sure to impress any ghoulish guest!
Recipe Variations: Get Creative!
If you’re feeling extra adventurous, why not try these creative twists on the original recipe?
-
Cheese Stuffed Fingers: Add a bit of mozzarella cheese into the dough before shaping for a gooey surprise inside.
-
Spicy Witch Fingers: Mix in some red pepper flakes into the garlic butter for a little kick.
-
Herbed Fingers: Incorporate dried herbs like oregano or basil into the dough for added flavor.
-
Sweet Treat Version: Substitute the garlic butter for melted chocolate and use almond slivers for a fun dessert take.
-
Gluten-Free Option: Use gluten-free pizza dough for a spooky treat everyone can enjoy, without feeling left out!
Chef’s Notes: A Little Bit of History
Witch Finger Breadsticks are a fun twist that has evolved over time. From traditional recipes to my own playful adaptation, they always bring a smile and a sense of whimsy. In fact, one year, I decided to host a witch-themed dinner party where everyone had to create their own creepy eats. It turned into a silly competition, and the recipe had a whole new life as we decorated our authors’ fingers with food coloring, toppings, and even googly eyes! Cooking should always be about joy, so don’t be afraid to get creative or a bit silly in the kitchen. After all, it is just a bit of dough and almonds!
FAQs and Troubleshooting
-
Can I use bread dough instead of pizza dough?
- Yes! If you have bread dough on hand, it can work beautifully as well. Just keep an eye on the baking time, as it may vary.
-
What if my dough is too sticky?
- If you find that your dough is sticky and hard to work with, dust your hands and work surface with a little more flour. That should make shaping easier.
-
Can I make these ahead of time?
- Absolutely! You can shape the breadsticks ahead of time, place them on a baking sheet, cover, and refrigerate. Just bake them fresh right before serving; they’ll taste even better!
-
How can I store leftovers?
- If you happen to have any leftover breadsticks, store them in an airtight container at room temperature. Reheat in the oven for a few minutes to restore their lovely crispness.
Nutritional Info
While we all know that Witch Finger Breadsticks are meant to be fun, let’s be real—indulgence is part of the charm! Each breadstick is generally around 80-100 calories, depending on the exact dimensions and how much garlic butter you slather on. Remember to balance fun treats with nutrition, and enjoy your baking!
Now, what are you waiting for? Let’s gather around and enjoy the magic of cooking together! These Witch Finger Breadsticks are sure to be the highlight of your Halloween gathering, sparking joy and delights all around. Happy Halloween, foodies!
PrintWitch Finger Breadsticks

Deliciously spooky breadsticks shaped like witch fingers, perfect for Halloween gatherings.
- Prep Time: 15 minutes
- Cook Time: 20 minutes
- Total Time: 35 minutes
- Yield: 12 servings 1x
- Category: Appetizer
- Method: Baking
- Cuisine: American
- Diet: Vegetarian
Ingredients
- 1 package pizza dough (homemade or store-bought)
- 1 cup blanched almonds (or whole pecans)
- 1/2 cup butter, melted
- 2 cloves garlic, minced
- Pinch of salt
Instructions
- Preheat the oven to 375°F (190°C).
- Prepare your pizza dough by resting it on a floured surface for about 15 minutes.
- Divide the dough into strips about 6-8 inches long and ½ inch wide.
- Shape each strip into a finger-like shape, tapering one end slightly.
- Create the nail bed by pinching one end and pressing an almond into it.
- Brush the shaped fingers with garlic butter mixture.
- Bake for 15-20 minutes until golden brown.
- Cool for a couple of minutes before serving with marinara sauce.
Notes
For added creativity, try cheese-stuffed fingers or sweetened versions with melted chocolate.
Nutrition
- Serving Size: 1 breadstick
- Calories: 100
- Sugar: 1g
- Sodium: 200mg
- Fat: 9g
- Saturated Fat: 5g
- Unsaturated Fat: 4g
- Trans Fat: 0g
- Carbohydrates: 9g
- Fiber: 1g
- Protein: 2g
- Cholesterol: 15mg
Keywords: Halloween, appetizers, spooky treats, breadsticks, Witch Finger Breadsticks