
Classic Rice Krispies Treats: A Nostalgic Delight
Hey there, fellow food lovers! Welcome back to my little kitchen paradise, where sprinkles reign supreme and every recipe is treated like a celebration. Today, I’m bursting with excitement to share one of the all-time classic treats that’s not only super easy to whip up but also brings a wave of nostalgia with every bite—Classic Rice Krispies Treats!
Now, let’s set the scene. Picture this: It’s a rainy afternoon, and the scent of melting marshmallows fills the kitchen. You’re standing at the counter with your excitement bubbling like the gooey mixture in your pot. Maybe you’re donned in an apron covered with flour, and there’s a playful twinkle in your eye because you know that soon, you’ll have a batch of ooey-gooey goodness awaiting your tastebuds.
These treats are more than just a snack; they’re a delightful blast from the past! I remember the first time I made them with my grandma—her worn-out cookbook open on the counter, a bit of butter stuck to its pages. We’d measure out butter, marshmallows, and Rice Krispies in perfect harmony. The goo would stick to our fingers, and I’d giggle every time she insisted we add extra sprinkles at the end, because why not? It turned into a sprinkle party, and we savored every crispy, chewy bite like it was pure gold.
As the years passed, I rediscovered this recipe countless times, each batch evoking warm memories and bringing friends and family together. That’s the magic of Rice Krispies Treats—they’re so versatile, always ready for a twist, and perfect for sharing. So, let’s dive into the ingredients and get cooking!
Ingredients
Before we get started, here are the simple ingredients you’ll need to create these nostalgic treats:
-
3 tablespoons butter
Butter is the magical ingredient that gives these treats their rich, creamy texture. If you’re looking for a healthier option, you can substitute with coconut oil or vegan butter for a dairy-free twist! -
1 package (10 oz) marshmallows or 4 cups miniature marshmallows
Marshmallows are the star of the show, offering that gooey sweetness we all crave. Miniature marshmallows tend to melt faster and distribute more evenly, but if you’re feeling ‘big,’ go with the regular ones and watch the gooey transformation! -
6 cups Rice Krispies cereal
This cereal provides that crunchy bite and forms the base of our delicious treat. If you want to jazz it up, feel free to swap in another cereal like Cocoa Krispies for a chocolatey twist! -
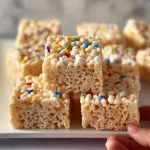
Optional: sprinkles or chocolate chips
Because who doesn’t love a little color and extra flavor? Adding sprinkles will turn your treats into a festive fun dessert, while chocolate chips bring a rich depth of flavor. You can’t go wrong here!
Now that we have our ingredients lined up, let’s get to the fun part—making these Marshmallow Magic Bars your friends won’t forget!
Step-by-Step Instructions
-
Melt the Butter
In a large pot over low heat, melt the butter slowly. Be patient! This step is where we get that creamy texture, so take your time. Stir it often until it’s completely melted and bubbling just a bit.Chef Tip: Use a non-stick pot to avoid any gooey mess getting stuck at the bottom!
-
Add the Marshmallows
Once the butter is melted, toss in the marshmallows. Stir gently until they melt and combine with the butter. You’ll see a beautiful, gooey mixture forming!Reminder: Make sure the heat is low enough; if it’s too high, your marshmallows can scorch, and no one wants that!
-
Mix in the Rice Krispies
Remove your pot from heat and let that heavenly mixture cool for just a minute. Then, add in the Rice Krispies. Use a spatula to fold them in gently but thoroughly. You want every piece of the cereal coated in that marshmallow goodness.Chef Hack: If you want an extra layer of flavor, sprinkle a pinch of salt into the pot after adding the Rice Krispies. It really enhances the sweetness!
-
Get to Shaping
Grease a 9×13-inch baking dish with butter or cooking spray (you know I love a little extra butter!). Pour your mixture into the dish and press it down evenly. Use slightly damp hands or a spatula to flatten it out—this part can get sticky, so having that little trick helps!Chef Tip: If you’re adding chocolate chips or sprinkles, sprinkle them on top of the mix while it’s still warm, and gently press them in for even distribution.
-
Let Them Set
Allow your Rice Krispies Treats to cool completely before cutting them into squares. This can take about 30 minutes, and you can pop them in the fridge for a quicker set if you’re feeling impatient! -
Cut and Enjoy!
Once they’re set, grab your knife and cut them into squares or rectangles. You can serve them right away, but they’re always best when shared with friends!
Serving Suggestions
These Classic Rice Krispies Treats are a crowd-pleaser on their own, but they’re easy to dress up too! Serve them on a colorful platter with a sprinkle of extra confetti on top, or drizzle some melted chocolate over them for a decadent experience. You can even stack them high on a cake stand for a visually stunning centerpiece at your next gathering!
Recipe Variations
Feeling adventurous? Here are a few fun twists you can try with your Rice Krispies Treats:
- S’mores Style: Add crushed graham crackers and mini chocolate chips for a campfire treat version!
- Fruit Loops or Cheerios: Swap out Rice Krispies for another cereal, like Fruit Loops, for a colorful and fruity spin.
- Nut Butter Energy Bites: Stir in some peanut or almond butter for a protein-packed treat that gives a nutty flavor.
- Coconut Delight: Mix in shredded coconut for a tropical twist. It’ll add sweetness and chewiness—yum!
Chef’s Notes
As someone who’s spent countless weekends in the kitchen experimenting with these treats, I have to say that they never fail to bring a smile to my face. Each batch I make seems to come with a different flavor profile depending on what I have on hand—sometimes it’s chocolate, while other times I toss in all my leftover candy (hello, Halloween leftovers!).
One time, I had some friends over, and we decided to add a dash of cinnamon to the marshmallow mix. A little unexpected, but it took our treats to the next level of cozy comfort! Just remember, there’s no “wrong” way to make Rice Krispies Treats; have fun and let your creativity lead the way!
FAQs and Troubleshooting
1. Why are my Rice Krispies Treats too hard?
If your treats end up too hard, it’s likely that they were overcooked. Always keep an eye on the marshmallows as they melt. You want them gooey and soft but not turning into a browned mess!
2. Can I use another type of marshmallow?
Totally! You can use flavored marshmallows or even homemade if you’re feeling ambitious. Just keep in mind that the texture might vary!
3. How do I store leftovers?
Store any leftovers in an airtight container at room temperature. They’ll stay fresh for up to a week. If they start to get hard, try microwaving for a few seconds to soften them up!
4. Can I freeze Rice Krispies Treats?
Yes! Cut them into squares and wrap them in plastic wrap. Just remember to place parchment paper between each square so they don’t stick together! They can be frozen for up to two months.
Nutritional Info
While it’s tempting to indulge in these tasty treats, here’s a quick overview of their nutritional information (per square, approximately 1 inch):
- Calories: 90
- Fat: 3g
- Carbohydrates: 15g
- Sugar: 7g
- Protein: 1g
Keep in mind that this varies depending on your specific ingredients and optional toppings.
And there you have it, folks—a nostalgic dive into making Classic Rice Krispies Treats! Whether for a cozy night in, a festive gathering, or just because it’s Tuesday, these treats are sure to brighten up your day. So grab that spoon, add a sprinkle or two, and let’s make some sweet memories together! Happy cooking!
PrintClassic Rice Krispies Treats
A nostalgic delight, these Classic Rice Krispies Treats are easy to make and perfect for sharing, bringing back warm memories with every chewy bite.
- Prep Time: 10 minutes
- Cook Time: 5 minutes
- Total Time: 45 minutes
- Yield: 12 servings 1x
- Category: Dessert
- Method: No-Bake
- Cuisine: American
- Diet: Vegetarian
Ingredients
- 3 tablespoons butter
- 1 package (10 oz) marshmallows or 4 cups miniature marshmallows
- 6 cups Rice Krispies cereal
- Optional: sprinkles or chocolate chips
Instructions
- Melt the butter in a large pot over low heat until bubbling.
- Add the marshmallows to the melted butter and stir until fully melted.
- Mix in the Rice Krispies cereal gently until evenly coated.
- Get to shaping by greasing a 9×13-inch baking dish and pressing the mixture evenly into the dish.
- Let them cool completely, about 30 minutes, before cutting.
- Cut into squares or rectangles and enjoy!
Notes
Feel free to customize with different cereals or mix-ins for extra flavor.
Nutrition
- Serving Size: 1 square
- Calories: 90
- Sugar: 7g
- Sodium: 30mg
- Fat: 3g
- Saturated Fat: 2g
- Unsaturated Fat: 1g
- Trans Fat: 0g
- Carbohydrates: 15g
- Fiber: 0g
- Protein: 1g
- Cholesterol: 10mg
Keywords: Rice Krispies, marshmallows, dessert, nostalgic treats, easy recipes