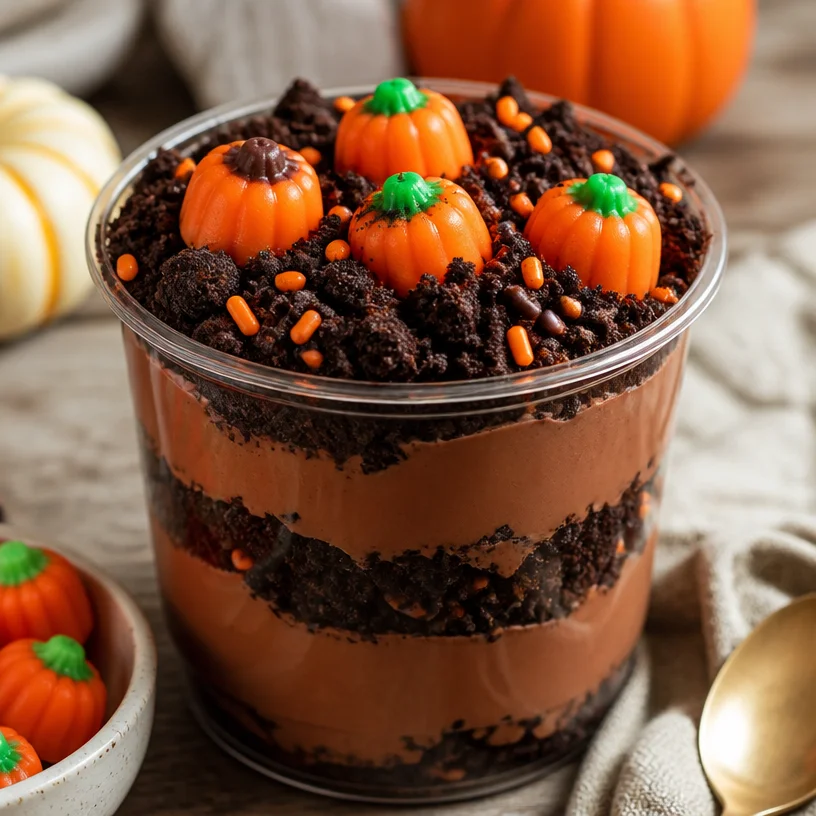
Pumpkin Patch Dirt Cups: A Whimsical Fall Treat
Ah, autumn! The leaves turn golden, the air gets crisp, and everything starts to feel a bit more magical. As the days shorten and we cozy up in our favorite sweaters, one culinary delight always brings a smile to my face—Pumpkin Patch Dirt Cups! These playful treats are not just a feast for the eyes; they evoke a sense of nostalgia and a sprinkle of fun in every bite.
Imagine this: you’re walking through a pumpkin patch, the scent of fall lingers in the air, and you’re surrounded by vibrant orange pumpkins just waiting to be turned into pies, lattes, or, in this case, the ultimate dessert cup. My love for these sweet creations sparked from many afternoons spent in the kitchen with my family, baking and creating little masterpieces that were as much about the joy of cooking together as they were about the outcome.
Pumpkin Patch Dirt Cups blend the rich, creamy delight of chocolate pudding with the crunch of cookie crumbs and the adorable, festive touch of candy pumpkins. They are indulgent yet simple, making them perfect for gatherings, festive parties, or just a fun treat while you binge-watch your favorite fall movie. So, roll up your sleeves, grab that spoon, and let’s bring some joy to your kitchen!
A Little Bit of Nostalgia
I vividly remember the first time I made Pumpkin Patch Dirt Cups—it was an impromptu Halloween gathering with friends in college. With no fancy equipment or running kitchen, we had to make do with what we had: a couple of bowls, some spoons, and a playful spirit! We whipped together quick chocolate pudding from a box (gasp, I know, but we were busy!); we layered it with cookie crumbs to create that dirt effect and topped it off with those delightful little candy pumpkins.
The fun didn’t stop there! We crafted mini “pumpkin patches” in our living room, complete with a makeshift scarecrow that we fashioned out of mismatched clothes and straw. As we stuffed our faces with the delicious dirt cups, we unveiled a major twist: we had a “who can build their pumpkin patch the fastest” competition! Laughter erupted as chocolate pudding smeared our faces and cookie crumbs flew everywhere. Those dirt cups turned a simple evening into a cherished memory, filled with joy, friendship, and a lot of deliciousness.
Ingredients
Let’s gather our ingredients so we can get started on our pumpkin patch madness:
-
Chocolate Pudding:
- A creamy base that’s simple to make from scratch or even with a boxed mix. If you want to mix it up, try using vanilla pudding for a different flavor combo.
-
Cookie Crumbs:
- I love using crushed Oreos for that classic “dirt” look! However, you can use graham crackers or any chocolate cookie you have on hand. Feeling adventurous? Try ginger snaps for a spicy twist!
-
Candy Pumpkins:
- These adorable little candies elevate the dessert and provide a pop of color. If you can’t find them, consider using gummy worms or chocolate-covered almonds shaped like pumpkins for a unique take!
-
Whipped Topping (optional):
- For an added touch of creaminess on top, consider adding whipped cream or Cool Whip. This adds an extra layer of delight that balances the richness of the pudding.
-
Miniature Spooky Decorations (optional):
- If you’re feeling festive, consider adding some edible eyeballs or gummy bats on top for fun Halloween vibes!
These ingredients come together beautifully to create a fun, visually appealing dessert that’ll have everyone grinning from ear to ear.
Step-by-Step Instructions
Ready to get your hands dirty? Let’s jump straight into making our Pumpkin Patch Dirt Cups.
1. Prepare the Chocolate Pudding
Start by either making your chocolate pudding from scratch or unearthing that trusty box mix. If you’re going with the homemade route, just follow the instructions on the package or whisk together milk and cocoa powder on the stove until it thickens (don’t forget to add a touch of sugar!). This should take about 5-10 minutes.
Chef’s Tip: For a dreamier texture, let your pudding chill in the refrigerator for about half an hour before assembling. It makes layering more enjoyable!
2. Crush the Cookies
While your pudding is chilling, grab those chocolate cookies and put them in a zip-top bag. Seal it tightly (the last thing you want is cookie crumbs all over your kitchen) and crush them into fine crumbs using a rolling pin. The consistency should be similar to sand.
Chef’s Hack: If you’re feeling like a little extra labor or have some kiddos around, this step is perfect for letting them get involved. It’s fun, messy, and tasty!
3. Assemble the Cups
Now, the fun part begins! Grab your favorite serving glasses or dessert cups. Start with a layer of chocolate pudding—fill the cups about a third of the way. Then, sprinkle a generous layer of cookie crumbs on top, creating that delicious “dirt” layer. Repeat this process until you reach the top of the cup.
Little Word of Advice: Don’t stress too much about being neat; these cups are meant to be playful and fun!
4. Add Whipped Topping
If you’re using whipped topping, grab a dollop and place it on top of the last layer of cookie crumbs. This adds an appealing contrast and makes your cup look extra delicious.
Bonus Tip: Use a piping bag with a star tip to make beautiful swirls if you’re feeling fancy.
5. Decorate with Candy Pumpkins
Finally, take your candy pumpkins and gently press them into the whipped topping or right on top of the cookie crumbs. Arrange them in a way that resembles a mini pumpkin patch!
Pro Tip: Tilt some of the pumpkins slightly for a more natural look, as if they’re nestled in the dirt.
6. Serve and Enjoy!
Cover the cups with plastic wrap and chill them in the refrigerator until you’re ready to serve. It’s a good idea to let them sit for at least 30 minutes to marry the flavors. When it’s time to dig in, just grab a spoon and watch the happiness unfold!
Serving Suggestions
Serve your Pumpkin Patch Dirt Cups on a festive platter, perhaps with some other autumn-inspired treats, like caramel apples or spiced cookies. You can even personalize each dessert with a little name tag for a fun party twist. Trust me; your guests will be delighted to see these charming creations and might even clamor for the recipe!
Recipe Variations
Looking to switch things up? Here are some fun variations that can add a twist to your Pumpkin Patch Dirt Cups:
- Layer in Some Pumpkin Spice: Mix a spoonful of pumpkin puree and pumpkin spice into your chocolate pudding for an autumnal flavor boost.
- Swap Cookies for Brownies: Instead of cookie crumbs, use crushed brownie bits for a richer taste.
- Vegan Version: Use a plant-based pudding mix, almond milk, and crushed vegan cookies for an entirely plant-friendly treat.
- Add a Boozy Twist: Drizzle a little caramel vodka over your cookie layer for an adult treat.
- Fruit Magic: Toss in some small pieces of candied apples or caramelized bananas between the layers for added sweetness.
Chef’s Notes
I have to say, these cups have evolved over time! My initial creation was a hit at parties, but I later discovered how versatile they could be. As I took on more dietary modifications (hello, vegan friends!), I found myself incorporating alternative ingredients that ended up being just as delicious—if not more! Plus, the creative options for toppings and layers keep it fresh every season.
And you know, there’s something about smearing chocolate pudding on your face while preparing a dessert that just makes life sweeter. Trust me on that one! 😉
FAQs and Troubleshooting
-
Can I make these cups in advance?
Absolutely! Make them a day ahead and store them in the refrigerator. They keep well for a couple of days, but the cookie crumbs may soften, so you might want to add those right before serving. -
What if my pudding doesn’t thicken?
If your pudding isn’t thickening, make sure you’re using the right proportion of milk and pudding mix. If it’s too runny, you can add a touch of cornstarch mixed with water, cooking it a little longer until it reaches your desired consistency. -
Can I substitute anything?
Yes! Use whatever type of cookie or pudding you love. Chocolate lovers can indulge in chocolate-cookie pudding, while those who prefer vanilla can go that route. -
What if I don’t have these specific candies?
No problem! Use whatever candies you have on hand, like gummy worms or even leftover Halloween candy for a fun surprise.
Nutritional Info
This recipe is meant to be an indulgence, but here’s a quick glance at what you can expect per serving:
- Calories: ~250-300 (depending on portion sizes and ingredients chosen)
- Protein: ~4g
- Carbohydrates: ~32g
- Fat: ~14g
Remember, these are just estimates, and variations based on your ingredients can alter the nutrition!
So, there you have it—a recipe for fun, laughter, and a little touch of joy in every scoop! Whether you’re sharing them with family, friends, or just treating yourself (because you deserve it), these Pumpkin Patch Dirt Cups are sure to become a fall favorite. Happy baking, and remember to have fun with it! 🍂✨
PrintPumpkin Patch Dirt Cups
A whimsical fall treat that combines chocolate pudding, cookie crumbs, and candy pumpkins for a playful dessert experience.
- Prep Time: 10 minutes
- Cook Time: 10 minutes
- Total Time: 20 minutes
- Yield: 4 servings 1x
- Category: Dessert
- Method: No-bake
- Cuisine: American
- Diet: Vegetarian
Ingredients
- 1 box chocolate pudding mix
- 2 cups milk
- 1 pack of crushed Oreo cookies
- 1 cup candy pumpkins (or gummy worms)
- Whipped topping (optional)
- Miniature spooky decorations (optional)
Instructions
- Prepare the chocolate pudding by mixing it with milk or using a boxed mix, following package instructions. Chill if desired.
- Crush the cookies in a zip-top bag until they resemble fine crumbs.
- Assemble the cups by layering chocolate pudding and cookie crumbs in dessert cups.
- Add whipped topping on top of the last layer of cookie crumbs if using.
- Decorate with candy pumpkins, pressing them into the whipped topping or crumbs.
- Serve and enjoy, chilling in the refrigerator before serving for best flavor.
Notes
These cups can be made in advance. Just add cookie crumbs right before serving to maintain crunch.
Nutrition
- Serving Size: 1 cup
- Calories: 300
- Sugar: 20g
- Sodium: 200mg
- Fat: 14g
- Saturated Fat: 7g
- Unsaturated Fat: 5g
- Trans Fat: 0g
- Carbohydrates: 36g
- Fiber: 1g
- Protein: 4g
- Cholesterol: 5mg
Keywords: pumpkin dessert, fall recipes, chocolate pudding, Halloween treats