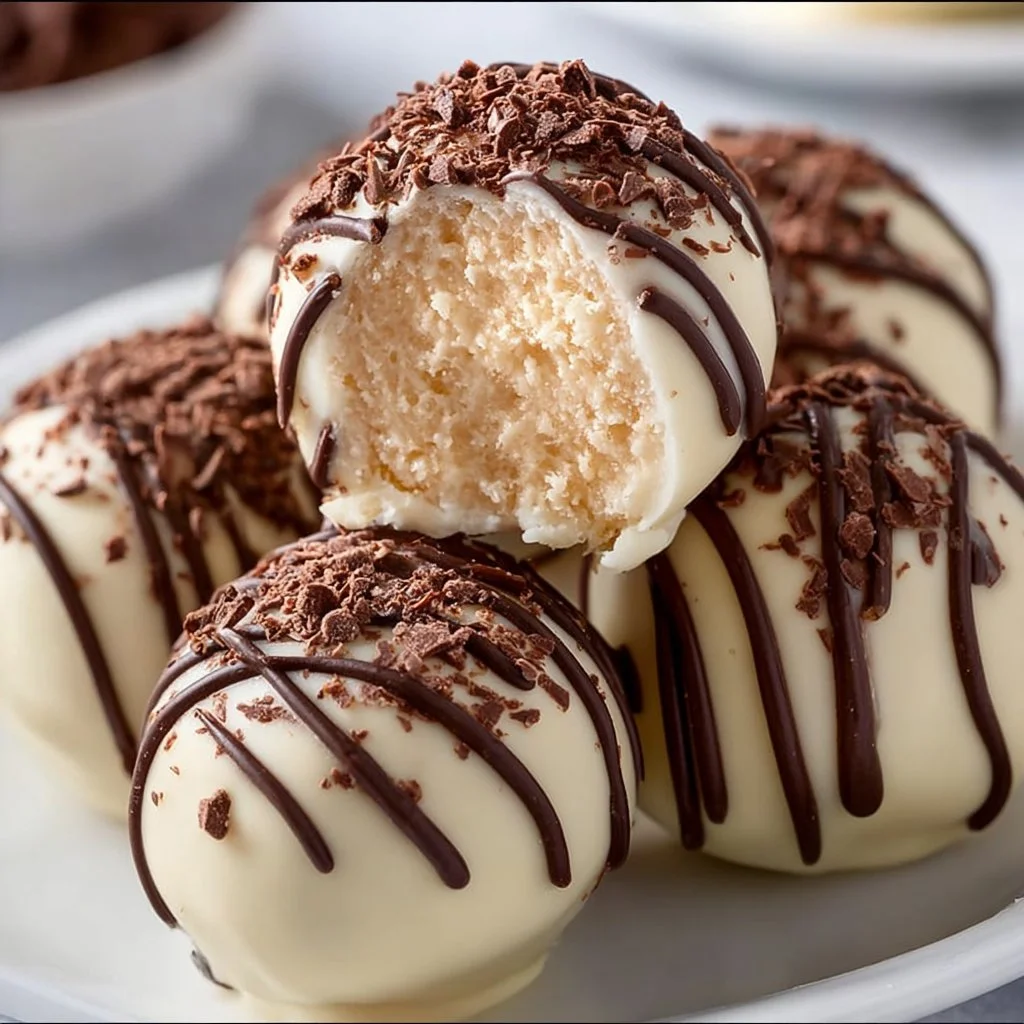
Baileys Cheesecake Balls: A Sweet Indulgence Worth Sharing
Hey there, fellow food lovers! 🌟 Today, I’m thrilled to share one of my all-time favorite treats—Baileys Cheesecake Balls. If you’re looking for something that’s creamy, decadent, and just downright delightful, you’ve hit the culinary jackpot. Picture this: small, luscious bites of cheesecake goodness, lovingly coated in chocolate and infused with the rich, velvety flavor of Baileys Irish Cream. Seriously, what’s not to love?
But wait! Before we dive into the gooey goodness of these cheesecake balls, let me take you on a little journey down memory lane. You see, desserts have always held a special place in my heart, but there’s something particularly nostalgic about cheesecake. Growing up, I’d often watch my grandmother whip up her signature cheesecake in the kitchen. She’d get all the ingredients laid out, a twinkle in her eye, and a splash of fun in her movements. The best part? She always let me lick the bowl clean—a privilege I treated like gold!
Years later, after experimenting with countless recipes and putting my own playful spin on things, I’ve created a recipe that marries those childhood memories with a touch of adult indulgence. These Baileys Cheesecake Balls are perfect for parties, casual get-togethers, or simply to brighten up a cozy night in. Trust me, your taste buds will be throwing a celebration, and your friends will be begging for the recipe!
So, grab your mixing bowl, roll up those sleeves, and let’s craft some heavenly bites of joy together!
Personal Story
I remember the very first time I decided to make a cheesecake. I was a young adult, trying to impress my then-girlfriend with a home-cooked meal. I had visions of crafting a glowing, creamy cheesecake dessert that was rich but not overdone. Channeling my inner pastry chef, I found my grandmother’s old recipe book buried in a kitchen drawer. As I flipped through the pages, each handwritten note filled with love tugged at my heartstrings.
But here’s where the adventure took a delicious twist! In a moment of creative spontaneity, I swapped out some of the traditional ingredients for Baileys Irish Cream. I was a bit nervous but also excited. The resulting dessert was unlike anything I had ever tasted, and it stole the show! That first bite, creamy and boozy, felt both nostalgic and totally new. My girlfriend loved it, and that night sparked a lifelong love for tweaking old recipes with fun new flavors. Since then, I’ve turned that initial cheesecake success into these cute little Baileys Cheesecake Balls, and they have become a staple at my gatherings ever since!
Ingredients
Before we roll up our sleeves (pun intended!), let’s gather our ingredients. Here’s what you’ll need to bring these delicious Baileys Cheesecake Balls to life:
-
2 dozen chocolate-covered butter cookies
These will serve as the magical foundation of our cheesecake balls. You can swap them out for any chocolatey cookie you fancy, like Oreo cookies, if you want a fun twist! -
8 ounces mascarpone cheese
This creamy delight gives the cheesecake its dreamy texture. If you can’t find mascarpone, cream cheese works too—just make sure to soften it beforehand for easy blending. -
1/2 cup Baileys Irish Cream
The star of the show! This luscious liqueur adds a rich flavor to the filling. If you prefer a non-alcoholic option, try substituting with coffee creamer or chocolate milk. -
1/2 cup powdered sugar
Sweetness is key! Powdered sugar dissolves beautifully into the mixture for a smooth finish. If you’re looking to cut calories, you can use a sugar substitute. -
1 teaspoon vanilla extract
A splash of vanilla elevates the flavors. For something even more special, consider adding a bit of almond extract for a delightful twist. -
Chocolate coating (for dipping)
You can use melting chocolates or chocolate chips—just be sure to temper them so they coat beautifully. White chocolate or dark chocolate can also add a fun twist!
Step-by-Step Instructions
Alright, my fellow chefs, let’s jump right into the fun part—making these Baileys Cheesecake Balls! Follow along with these step-by-step instructions sprinkled with some love:
-
Crush the Cookies
Start by grabbing those chocolate-covered butter cookies! Place them in a food processor and pulse until you have fine crumbs. Don’t have a food processor? No worries! Toss them in a resealable bag and smash them with a rolling pin until they resemble sand. Set aside. -
Mix the Creamy Filling
In a large mixing bowl, combine the mascarpone cheese, Baileys Irish Cream, powdered sugar, and vanilla extract. Use a spatula or an electric mixer to blend them until you achieve a smooth, creamy consistency. It’s like a cozy hug in a bowl! If you’re using cream cheese instead of mascarpone, beat it until it’s nice and soft for the best results. -
Incorporate the Cookie Crumbs
Gradually fold in the crushed cookie mixture into the creamy filling. Don’t go in too fast! This is the moment when you create that irresistible cheesecake center. Be gentle; we want all those flavors to meld together beautifully. -
Chill the Mixture
Cover the bowl with plastic wrap and pop it in the refrigerator for about 30 minutes. This step is crucial, my friends! Chilling the mixture helps it firm up, making it easier to scoop and roll later. It also gives those flavors a chance to mingle! -
Shape the Balls
Once chilled, take a tablespoon—or better yet, a small cookie scoop—of the mixture and roll it into balls. Aim for about 1 to 1.5 inches in diameter. Try not to eat them all right now—you’ll want to savor those bites after they’re dipped in chocolate! -
Chill Again
Place your cheesecake balls on a baking sheet lined with parchment paper and put them back in the fridge for another 20-30 minutes. This helps them hold their shape while you’re dipping them in chocolate. -
Melt the Chocolate
While those babies are chilling, melt your chocolate coating in a microwave-safe bowl or using a double boiler. If you’re using the microwave, heat in 20-second intervals, stirring in between until smooth. -
Dip and Decorate
Once the cheesecake balls are chilled and your chocolate is ready, dip each ball into the melted chocolate, using a fork or toothpick to coat them evenly. Let any excess chocolate drip off before placing them back on the parchment paper. If you’re feeling extra fancy, sprinkle some crushed cookies or edible glitter on top before the chocolate sets! -
Let Them Set
Pop the tray back in the fridge for 15-20 minutes or until the chocolate has completely hardened. This is the moment we’ve all been waiting for! -
Serve and Enjoy
Once everything is set, serve these delightful little bites to your friends, family, or just yourself (no judgment here!). Pair them with coffee or a glass of milk for the ultimate indulgence!
Serving Suggestions
When it comes to serving your Baileys Cheesecake Balls, I love to keep it fun and casual. Arrange them on a colorful platter or tiered cake stand for a lovely presentation. For an extra touch, dust with cocoa powder or shredded coconut to add a playful contrast. If you’re feeling adventurous, garnish the platter with some fresh berries or mint leaves. Not only does it look beautiful, but it also adds a lovely freshness to balance the richness of the cheesecake.
Recipe Variations
Now that you’ve mastered the classic Baileys Cheesecake Balls, here are a few fun variations to keep things exciting:
-
Mint Chocolate Baileys: Add a few drops of mint extract to the cream mixture for a refreshing twist.
-
Espresso Infusion: Mix in a teaspoon of instant coffee or espresso powder for a chic coffee-flavored cheesecake ball.
-
Nutty Delights: Incorporate crushed nuts, like pecans or walnuts, into the filling for added crunch and flavor.
-
Fruit Explosion: Swirl in some fruit preserves or fresh fruit puree to bring in a tartness and lighten up the richness.
-
Coconut Dream: Substitute the chocolate coating with white chocolate and roll in shredded coconut for a tropical twist.
Chef’s Notes
These Baileys Cheesecake Balls have become a cherished recipe in my kitchen, and I’ve watched them evolve over the years. I originally intended to make them just for special occasions, but they’ve found their way into my regular dessert rotation. I’ve even made mini versions for weddings—just think of how cute they look as party favors!
And here’s a little secret, sometimes I tweak the recipe by adding seasonal flavors, like pumpkin spice in the fall or peppermint during the holidays. Honestly, the possibilities are endless! Just remember, the key to a great cheesecake ball is to have fun and be a little adventurous in your kitchen!
FAQs and Troubleshooting
Q: My cheesecake balls are too soft; how do I fix that?
A: If your cheesecake mixture is too soft, make sure to chill it longer before rolling. You might also consider adding a bit more crushed cookies to help firm it up.
Q: Can I make these ahead of time?
A: Absolutely! These cheesecake balls can be made ahead of time and stored in an airtight container in the fridge for up to a week. Just keep in mind that they’re best served fresh!
Q: How do I store leftovers?
A: Store any leftover cheesecake balls in an airtight container in the fridge. If they hang around too long (unlikely!), they should still be good for about a week.
Q: What can I substitute Baileys with to make a non-alcoholic version?
A: You can use flavored coffee creamers, chocolate milk, or even a splash of vanilla extract mixed in with some milk for a great non-alcoholic alternative.
Nutritional Info
For those curious about the nutritional aspect, here’s a simple breakdown per cheesecake ball (based on making approximately 24 balls):
- Calories: ~110
- Fat: ~6g
- Carbohydrates: ~12g
- Protein: ~1.5g
- Sugar: ~5g
(Note: Nutritional values are estimates and can vary based on specific ingredients used.)
There you have it—a delightful journey into the world of Baileys Cheesecake Balls! Thank you for joining me in this flavorful adventure. I hope these little bites of joy bring as much happiness to your kitchen as they’ve brought to mine. So, what are you waiting for? Grab that mixing bowl and celebrate the sweetness of life with these delicious treats! Happy cooking! 🍰💚
PrintBaileys Cheesecake Balls
Creamy and decadent Baileys Cheesecake Balls coated in chocolate, perfect for any occasion.
- Prep Time: 15 minutes
- Cook Time: 10 minutes
- Total Time: 45 minutes
- Yield: 24 servings 1x
- Category: Dessert
- Method: Chilling and Dipping
- Cuisine: Irish
- Diet: Vegetarian
Ingredients
- 2 dozen chocolate-covered butter cookies
- 8 ounces mascarpone cheese
- 1/2 cup Baileys Irish Cream
- 1/2 cup powdered sugar
- 1 teaspoon vanilla extract
- Chocolate coating (for dipping)
Instructions
- Crush the cookies in a food processor until fine crumbs form. Set aside.
- Mix the mascarpone cheese, Baileys Irish Cream, powdered sugar, and vanilla extract in a bowl until smooth.
- Incorporate the crushed cookie mixture into the creamy filling.
- Chill the mixture in the refrigerator for about 30 minutes.
- Shape into balls, about 1 to 1.5 inches in diameter.
- Chill again for another 20-30 minutes.
- Melt the chocolate coating in the microwave or double boiler.
- Dip each ball in the melted chocolate and let excess drip off.
- Let the chocolate set in the fridge for 15-20 minutes.
- Serve and enjoy with coffee or milk.
Notes
These cheesecake balls can be made ahead of time and stored in an airtight container in the fridge for up to a week.
Nutrition
- Serving Size: 1 ball
- Calories: 110
- Sugar: 5g
- Sodium: 50mg
- Fat: 6g
- Saturated Fat: 3g
- Unsaturated Fat: 2g
- Trans Fat: 0g
- Carbohydrates: 12g
- Fiber: 0g
- Protein: 1.5g
- Cholesterol: 15mg
Keywords: Baileys, cheesecake, dessert, no-bake, chocolate