Sweet Indulgence: Cherry Pie Bars That Will Make Your Day
Hey there, fellow foodies! If you’re anything like me, there are few things in life that give you more joy than a slice of homemade pie—especially when it comes to the wonderful world of cherries. But let’s face it: sometimes, the thought of rolling out pie crust and meticulously crafting each layer can be a bit daunting. That’s why today, I’m bringing you a recipe that combines all the flavors of a traditional cherry pie but is elegantly simple and just downright delightful: Cherry Pie Bars!
Imagine biting into a warm, sweet bar, bursting with juicy cherries, all nestled in a buttery, crumbly base. These cherry pie bars are perfect for any occasion—whether you’re hosting a small gathering, treating yourself on a cozy evening, or simply craving a little indulgence. And the best part? They’re a breeze to make! So grab your apron and let’s get baking!
In this recipe, we’ll tap into nostalgia, ease, and a personalized touch that will ensure your Cherry Pie Bars are not only scrumptious but also made with love. These beauties are sure to bring a smile to your face (and those of your friends and family!). So, let me take you on a journey filled with sweet memories and sprinkle some joy into your kitchen!
A Sweet Memory: Cherry Picking Adventure
Growing up, my family took an annual road trip to the cherry orchards each July. Those trips were more than just an excuse for a scenic drive; they were a tradition, a rite of summer. The sun would shine on our faces as we picked ripe, juicy cherries straight from the trees, laughing and racing to fill our baskets. My mom would always turn our bounty into a delicious cherry pie that filled our house with the most wonderful aroma—amber-sweet with a hint of tartness.
I remember sitting at the kitchen counter, the sticky juice smudged on my cheeks as I helped pit cherries (and snuck a few into my mouth, of course). After a long wait, we’d finally dig into that warm pie after dinner, served with a big scoop of vanilla ice cream. Pure bliss! I wanted to recreate that joyful feeling in a simpler way, so I created these Cherry Pie Bars. They are an embodiment of those cherished summer memories, and I can’t wait for you to make your own!
Ingredients
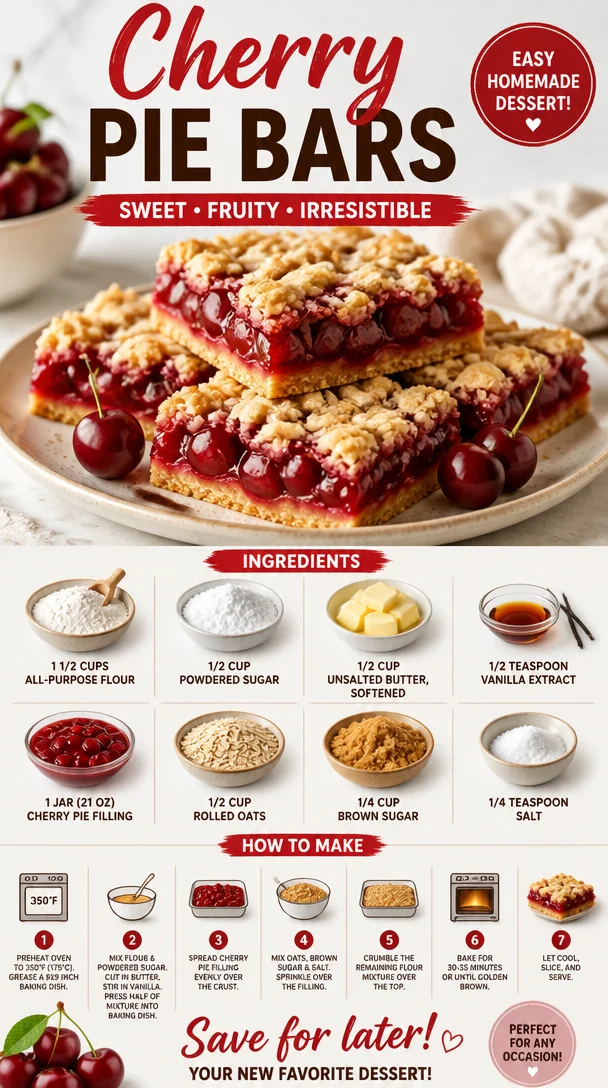
To craft your Cherry Pie Bars, you’ll need just a handful of simple ingredients. Here’s what you’re going to need:
-
1 1/2 cups all-purpose flour
This is the backbone of our crumbly base. You can swap it with a gluten-free flour blend if you’re in need of a gluten-free option. -
1/2 cup powdered sugar
This adds sweetness without the graininess of granulated sugar. If you’re out of powdered sugar, you can blitz granulated sugar in a blender until fine. -
1/2 cup unsalted butter, softened
A rich, creamy addition that brings everything together. Make sure it’s at room temperature for easy mixing. If you prefer a dairy-free option, coconut oil works nicely! -
1/2 teaspoon vanilla extract
This essential flavor booster elevates the taste to another level. If you’re out, almond extract can make for an interesting twist. -
1 jar (21 oz) cherry pie filling
The star ingredient! Store-bought makes it super easy, but homemade cherry filling using fresh cherries can take these bars to a whole new level of deliciousness. -
1/2 cup rolled oats
They add fantastic texture and a hint of nuttiness to the bars. You can use quick oats if that’s what you have on hand—just don’t use instant. -
1/4 cup brown sugar
For a touch of molasses flavor and moisture. If you’re in a pinch, granulated sugar works fine, though it won’t have that deep flavor. -
1/4 teaspoon salt
This helps to balance the sweetness. Be sure not to skip it!
These ingredients all come together to create something sweet, delicious, and oh-so-satisfying.
Step-by-Step Instructions
Ready to bring these Cherry Pie Bars to life? Let’s roll up our sleeves and get started! Here’s how you do it:
-
Preheat Your Oven & Prep Your Pan
Start by preheating your oven to 350°F (175°C). While that’s warming up, grease an 8×8-inch baking pan or line it with parchment paper for easy removal later. Don’t skip this step; you want those bars to come out effortlessly! -
Make the Dough
In a large bowl, combine the all-purpose flour and powdered sugar. Cut in the softened butter using a pastry cutter or your fingertips until crumbly, resembling coarse sand. You want to incorporate the butter completely but don’t overmix—or you’ll end up with tough bars. -
Add Vanilla
Pour in that dreamy vanilla extract and mix it until it’s just combined. It might look a bit crumbly and dry—perfect! This is your base. -
Press It Down
Take about two-thirds of the dough mixture and press it firmly into the bottom of the prepared baking pan. Make sure it’s even; this will be your crust. Use the back of a measuring cup for an even better press and compact it. -
Spread the Cherry Filling
Open that jar of cherry pie filling and spread it evenly over the crust. It’s like a colorful, sticky layer of happiness! Don’t be shy—you want this to be generous! -
Prepare the Oat Topping
In the same bowl, add the rolled oats, brown sugar, and salt to the remaining dough mixture. This is going to create your crumbly topping. Just combine it lightly and then sprinkle it evenly over the cherry filling. -
Bake
Pop the pan in your preheated oven and bake for about 30 to 35 minutes, or until the topping is golden brown and the cherry filling is bubbly and irresistible. Your kitchen will smell heavenly—trust me! -
Cool It Down
Once baked, remove the pan from the oven and let it cool in the pan for about 15 minutes. Then, transfer it to a wire rack to cool completely. Patience is key; I know it’s tempting, but cutting into them warm can make a glorious mess! -
Slice and Serve
Once cooled, slice them into bars (or squares, if you prefer) and plate them up. Feel free to dust with a little powdered sugar for that extra special touch!
Serving Suggestions
For the perfect serving experience, plate these cherry pie bars on a beautiful dessert platter. You can drizzle a bit of icing over the top or pair them with a scoop of vanilla ice cream for that scoop-and-bar combo that no one can resist! Add a sprig of mint for a pop of color and freshness.
Recipe Variations
Feeling adventurous? Here are a few creative twists you can try with this recipe:
-
Berry Medley: Mix in fresh blueberries or raspberries with the cherry filling for a vibrant berry mix!
-
Nutty Crunch: Stir in chopped pecans or walnuts into the oat topping for added texture and flavor.
-
Coconut Bliss: Substitute some of the oats with shredded coconut for a tropical vibe.
-
Chocolate Lovers: Drizzle melted chocolate over the bars after they cool for a decadent chocolate-cherry combination.
-
Gluten-Free Twist: Use a gluten-free flour blend instead of all-purpose flour and gluten-free oats to make it friendly for gluten-free diets.
Chef’s Notes
This recipe has become a cherished staple in my kitchen. I love how it holds the essence of a traditional cherry pie while being so much easier to whip up. Plus, it’s a fantastic way to bring friends and family together—everyone will want a taste of these beauties! I still remember one time when I tried adding a pinch of cinnamon to the oat topping—it was a game-changer!
Whenever I bake these cherry pie bars, I’m brought back to those sunny mornings spent picking cherries with my family. Each bite is sprinkled with that nostalgia, reminding me of those precious moments that we share in the kitchen.
FAQs and Troubleshooting
Q: Why are my cherry pie bars falling apart?
A: If your bars are crumbling, it might be that the dough wasn’t packed tightly enough before baking. Make sure to press it firmly into the pan!
Q: Can I use frozen cherries instead of pie filling?
A: Absolutely! Just thaw and drain them, then mix with sugar and a cornstarch slurry to thicken those lovely juices.
Q: How do I store leftovers?
A: Store your Cherry Pie Bars in an airtight container at room temperature for up to 3 days or refrigerate for up to a week. You can even freeze them for later—just make sure to wrap them tightly!
Q: Can I make these vegan?
A: You can! Substitute the unsalted butter with coconut oil or a vegan butter alternative, and use a plant-based milk in place of regular milk, if any dairy is needed!
With that, I hope you’re inspired to get in your kitchen and whip up these delightful Cherry Pie Bars! Trust me; every bite is a sweet little reminder that food brings us joy, and that’s what it’s all about. Happy baking, friends!
PrintCherry Pie Bars
Delightful cherry pie bars that are easy to make and perfect for any occasion. Enjoy the wonderful flavors of cherry pie in a simple bar form!
- Prep Time: 15 minutes
- Cook Time: 30 minutes
- Total Time: 45 minutes
- Yield: 12 servings 1x
- Category: Dessert
- Method: Baking
- Cuisine: American
- Diet: Vegetarian
Ingredients
- 1 1/2 cups all-purpose flour
- 1/2 cup powdered sugar
- 1/2 cup unsalted butter, softened
- 1/2 teaspoon vanilla extract
- 1 jar (21 oz) cherry pie filling
- 1/2 cup rolled oats
- 1/4 cup brown sugar
- 1/4 teaspoon salt
Instructions
- Preheat your oven to 350°F (175°C). Grease an 8×8-inch baking pan or line it with parchment paper.
- Combine the all-purpose flour and powdered sugar in a large bowl. Cut in the softened butter until crumbly.
- Add the vanilla extract and mix until just combined.
- Press about two-thirds of the dough mixture into the bottom of the prepared baking pan.
- Spread the cherry pie filling evenly over the crust.
- Mix the rolled oats, brown sugar, and salt into the remaining dough mixture and sprinkle it evenly over the cherry filling.
- Bake for 30 to 35 minutes, or until the topping is golden brown and the filling is bubbly.
- Cool in the pan for about 15 minutes, then transfer to a wire rack to cool completely.
- Slice into bars and serve, optionally dusted with powdered sugar.
Notes
Serve with a scoop of vanilla ice cream or drizzle with icing for extra sweetness.
Nutrition
- Serving Size: 1 bar
- Calories: 200
- Sugar: 12g
- Sodium: 100mg
- Fat: 8g
- Saturated Fat: 4g
- Unsaturated Fat: 2g
- Trans Fat: 0g
- Carbohydrates: 30g
- Fiber: 1g
- Protein: 2g
- Cholesterol: 20mg
Keywords: cherry pie, dessert bars, easy pie recipe, cherry dessert, baking