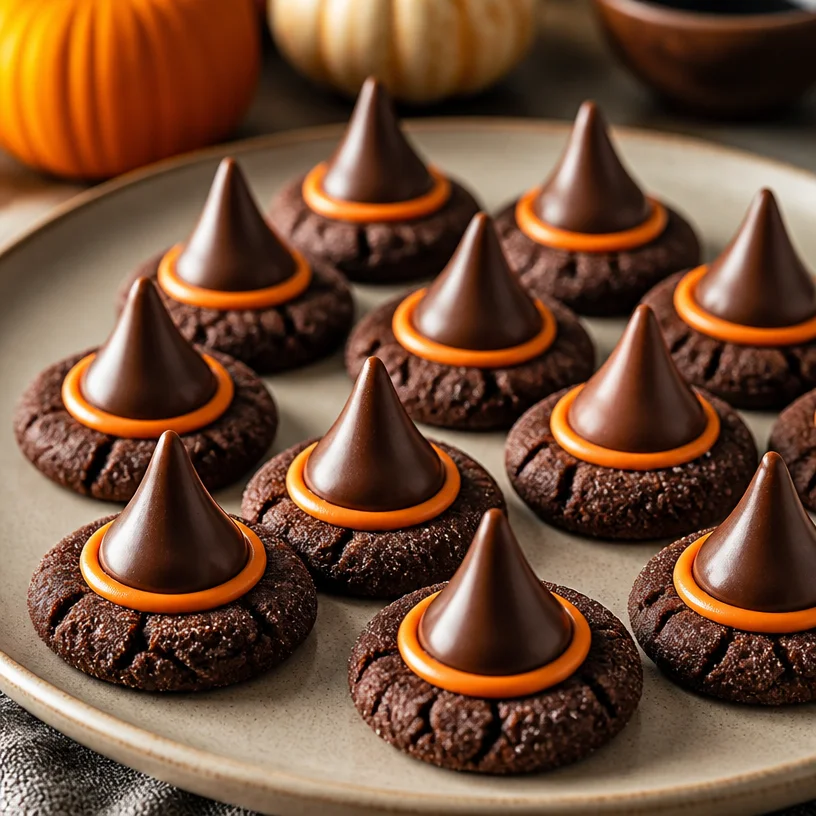
Witch Hat Cookies: A Spooktacular Treat for Every Halloween Gathering
It’s that magical time of year when the leaves start to change color, the air feels crisp, and ghosts and goblins roam the streets. Halloween isn’t just about the costumes and spooky decorations; it’s also about deliciously fun treats that bring a little joy to the eerie atmosphere. So, grab your broomsticks and get ready to whip up something delightful and whimsical with these Witch Hat Cookies!
Witch Hat Cookies are not only scrumptious, but they also serve as the perfect conversation starter at your Halloween parties. Picture this: a rich chocolate cookie topped with a melting chocolate kiss, creating the iconic pointy witch hat that we all know and love. The moment I first made these cookies, my kitchen was filled with laughter and the delightful aroma of chocolate, transporting me back to my childhood days of trick-or-treating and harvesting Halloween candy.
What I love most about these Witch Hat Cookies is that they come with a side of nostalgia. They make me think of my mom and her annual Halloween baking sessions. Year after year, she’d gather our neighborhood friends and our little hands would be covered in flour, laughter echoing through the kitchen as we eagerly decorated our creations. So, let’s dive into this recipe that fuses fun, creativity, and a little bit of Halloween magic!
A Sweet Blast from the Past
I remember the first time I made Witch Hat Cookies with my mom. It was Halloween night, and the excitement in the air was palpable. We spent the afternoon in the kitchen, baking and decorating a variety of Halloween cookies. But the Witch Hat Cookies quickly became the star of our spooky spread.
As kids, we were no strangers to the kitchen, but this experience was extra special. I vividly recall plopping the chocolate kisses on top of the cookies while my mom drizzled colorful icing on them to resemble cobwebs. I was completely mesmerized, watching her transform simple ingredients into edible art. The cookies turned out to be a hit at our neighborhood Halloween party, and I still cherish that memory.
Every bite was a delightful mix of chocolatey goodness combined with the fun of crafting something special with the people we love. And now, I want to pass that joy onto you! Ready to create your own spooky memories? Let’s get started!
Ingredients
-
Cookies:
- 1 cup unsalted butter: For that rich, buttery flavor! You can substitute with margarine if needed, but butter adds a unique richness you won’t want to miss.
- 1 cup granulated sugar: This sweet goodness not only sweetens the cookies but helps them achieve that lovely chewy texture.
- 1 cup brown sugar: Adds moisture and a touch of caramel flavor. If you don’t have brown sugar, you can replace it with an equivalent amount of granulated sugar mixed with a tablespoon of molasses.
- 2 large eggs: These help bind the ingredients together. If you’re looking for a vegan option, you may substitute with flax eggs made by mixing a tablespoon of ground flaxseed with three tablespoons of water.
- 2 teaspoons vanilla extract: A must-have for flavor. If you want to switch things up, almond extract could add a fun twist!
- 3 cups all-purpose flour: You can use whole wheat flour for a nuttier flavor, but you may need to adjust the liquid slightly.
- 1 cup unsweetened cocoa powder: The star of the show! It gives the cookies their chocolate flavor. You can experiment with different brands for varying intensities.
- 1 teaspoon baking soda: This is crucial for leavening your cookies. Baking powder could work in a pinch, but use double the amount.
- 1/2 teaspoon salt: Just a pinch to balance out all those sweet flavors!
-
Toppings:
- Chocolate kisses: The iconic top of our witch hats. You can also use chocolate-covered caramels if you want a different take.
- Colorful icing (optional): For extra flair! Make your own or use store-bought.
Now that we have gathered our ingredients, it’s time to unleash our inner witches (or wizards) in the kitchen!
Step-by-Step Instructions
-
Preheat the Oven:
Preheat your oven to 350°F (175°C). This step is crucial to ensure even baking. While waiting, sing your favorite Halloween tune to get into the spooky spirit! -
Cream the Butter and Sugars:
In a large bowl, cream together 1 cup of unsalted butter, 1 cup of granulated sugar, and 1 cup of brown sugar until light and fluffy. This should take about 2–3 minutes. Pro tip: Make sure your butter is at room temperature for best results—cold butter won’t mix well. -
Add Eggs and Vanilla:
Beat in the 2 large eggs, one at a time, and then add 2 teaspoons of vanilla extract. Scrape down the sides of the bowl to ensure everything is evenly mixed. Just imagine the sweet, sweet aroma wafting through your kitchen—joyful moments await! -
Dry Ingredients Assemble:
In a separate bowl, whisk together 3 cups of all-purpose flour, 1 cup of unsweetened cocoa powder, 1 teaspoon of baking soda, and 1/2 teaspoon of salt until well combined. This step helps to prevent lumps and ensures an even distribution of flavors. -
Combine Wet and Dry Ingredients:
Gradually add the dry ingredients to the butter-sugar mixture, mixing until just combined. Do not overmix; just combine until you see no floury bits. A little extra flour here can help you achieve that perfect cookie dough consistency. -
Shape the Cookies:
Using a cookie scoop or a tablespoon, drop rounded balls of dough about 2 inches apart onto ungreased baking sheets. Don’t worry about making them perfect; a little rustic charm will add to the fun! -
Bake:
Bake in your preheated oven for 10–12 minutes. The cookies will look slightly underbaked—trust me! They will firm up as they cool, giving you that perfect chewy texture. -
Add Chocolate Kisses:
Once your cookies are out of the oven, immediately press a chocolate kiss into the center of each cookie. Allow them to cool for about 5 minutes on the baking sheet before transferring them to a wire rack. Little tip: If you’re feeling festive, drizzle some melted white chocolate over the cookies for a spookier look. -
Decorate (Optional):
If you want to take your Witch Hat Cookies to the next level, use colorful icing to create fun designs around the base of the chocolate kisses or even spider web patterns on the cookies.
And there you have it—beautifully crafted Witch Hat Cookies ready to impress your family and friends!
Serving Suggestions
To serve your Witch Hat Cookies, arrange them on a spooky-themed platter adorned with mini pumpkins or cobweb decorations. You could even lay them out next to a cauldron filled with warm apple cider for that perfect Halloween vibe! Remember, presentation goes a long way in creating memorable moments!
Recipe Variations
- Peanut Butter Twist: Swap out some of the butter for creamy peanut butter for a fun, nutty flavor.
- Gluten-Free Version: Replace all-purpose flour with a 1:1 gluten-free flour blend, and you’re good to go!
- Minty Surprise: Add a few drops of peppermint extract into the dough for a chocolate-mint delight.
- Spicy Chocolate: Mix in 1 teaspoon of cinnamon and a pinch of cayenne for a surprising kick in your cookies.
- Nutty Flare: Fold in a handful of chopped nuts or chocolate chips into the dough for an enticing texture.
Chef’s Notes
This recipe has seen quite the journey over the years! I first stumbled upon it while browsing through a magazine during one of my college days. Adapting it to reflect my love for sprinkles, I started adding accents that turned it from just a cookie to a festive family tradition.
One Halloween, I accidentally mixed up the chocolate kisses with caramel candies. The surprise inside turned out to be a delightful treat that my friends and I couldn’t stop raving about. Now both versions are a must-have in my Halloween bake-off!
FAQs and Troubleshooting
1. Why are my cookies flat?
This could be due to too much sugar or not enough flour. Make sure to measure accurately! Also, ensure your baking soda is fresh for optimal rising.
2. Can I store these cookies?
Absolutely! Keep them in an airtight container for up to a week. If you want to store them longer, simply freeze them and thaw when you’re ready to enjoy!
3. Why did my chocolate kisses melt too much?
If the cookies are too hot when you press in the kisses, they may melt more than you’d like. Just let the cookies cool slightly before adding the kisses to maintain their shape.
4. Can I use something other than chocolate kisses?
Sure! Feel free to use any candy or decorative item you’d like—just be mindful of how they’ll look on the cookies.
Nutritional Info
While I believe in indulging during special occasions like Halloween, here’s a quick breakdown to help you keep track:
- Serving Size: 1 cookie
- Calories: Approximately 150
- Total Fat: 7g
- Saturated Fat: 4g
- Carbohydrates: 20g
- Sugar: 10g
- Protein: 2g
Now that you’ve got the scoop on Witch Hat Cookies, it’s your turn to create some sweet, spooky memories this Halloween! Whether you’re enjoying them with family or bringing them to a gathering, these delightful treats are sure to be a hit. Happy baking, and may your kitchen be filled with joy and laughter!
PrintWitch Hat Cookies
A delightful and spooky treat for Halloween gatherings, these rich chocolate cookies topped with melting chocolate kisses are sure to be a hit!
- Prep Time: 15 minutes
- Cook Time: 12 minutes
- Total Time: 27 minutes
- Yield: 24 servings 1x
- Category: Dessert
- Method: Baking
- Cuisine: American
- Diet: Vegetarian
Ingredients
- 1 cup unsalted butter
- 1 cup granulated sugar
- 1 cup brown sugar
- 2 large eggs
- 2 teaspoons vanilla extract
- 3 cups all-purpose flour
- 1 cup unsweetened cocoa powder
- 1 teaspoon baking soda
- 1/2 teaspoon salt
- Chocolate kisses for topping
- Colorful icing (optional)
Instructions
- Preheat your oven to 350°F (175°C).
- Cream together the butter, granulated sugar, and brown sugar until light and fluffy.
- Add the eggs, one at a time, and then the vanilla extract.
- Whisk together the flour, cocoa powder, baking soda, and salt in a separate bowl.
- Combine the dry ingredients with the wet mixture until just combined.
- Shape the dough into rounded balls on ungreased baking sheets.
- Bake for 10–12 minutes until slightly underbaked.
- Add a chocolate kiss into the center of each cookie immediately after baking.
- Cool for 5 minutes before transferring to a wire rack.
- Decorate with colorful icing, if desired.
Notes
These cookies can be stored in an airtight container for up to a week or frozen for longer storage.
Nutrition
- Serving Size: 1 cookie
- Calories: 150
- Sugar: 10g
- Sodium: 100mg
- Fat: 7g
- Saturated Fat: 4g
- Unsaturated Fat: 3g
- Trans Fat: 0g
- Carbohydrates: 20g
- Fiber: 1g
- Protein: 2g
- Cholesterol: 30mg
Keywords: Halloween, cookies, chocolate, dessert, spooky treats, Witch Hat Cookies