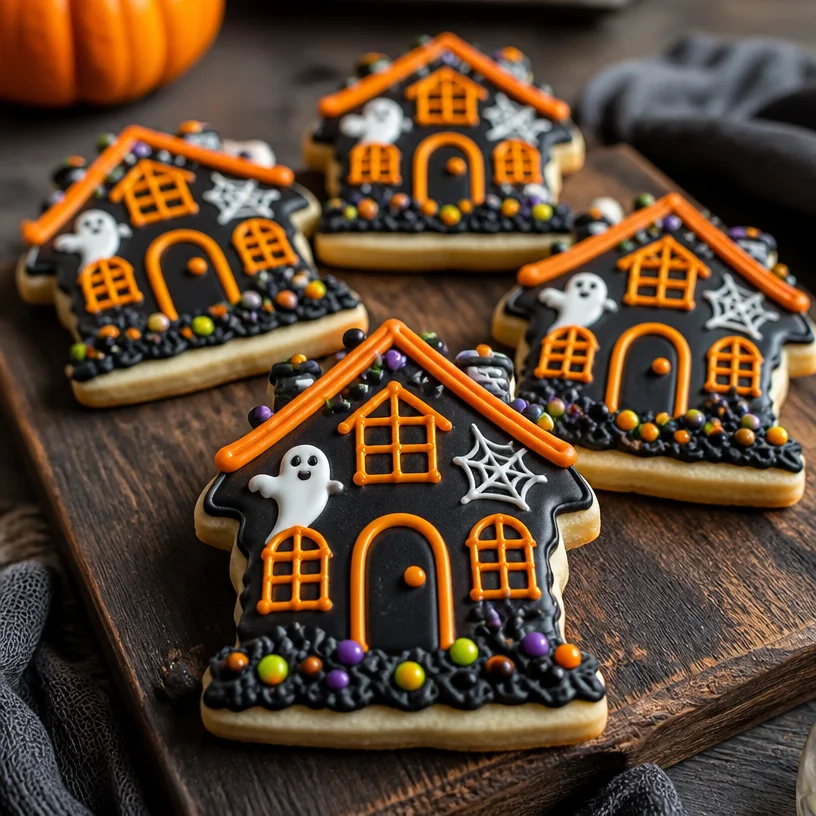
Haunted House Cookies: A Deliciously Spooky Treat
Introduction
Boo! Halloween is just around the corner, and what better way to embrace the festive spirit than with some delightfully creepy—and yummy—Haunted House Cookies? These fun little creations are not just treats; they’re an experience! Imagine gathering your friends or family around the kitchen table, rolling out dough, and decorating cookies that evoke all the spooky vibes of the season.
Creating Haunted House Cookies is a fantastic way to merge creativity with culinary skills while channeling your inner child. Isn’t that what cooking and baking are all about—having fun, enjoying the process, and creating beautiful things together? Whether it’s for a Halloween party, a school event, or just to indulge in some spooky fun at home, these cookies allow you to unleash your imagination.
Remember the days of trick-or-treating, the thrill of dressing up, and the excitement that surrounded finding the perfect treat? This recipe is a nod to those joyful moments, blending nostalgia with creativity, all while sporting a sprinkle of magic (and a dash of sprinkles, of course). So, grab your apron and roll up your sleeves; let’s dive into the thrilling world of Haunted House Cookies!
Personal Story
Growing up, Halloween was one of my favorite holidays. The air would fill with the scent of fall leaves and pumpkin spice, and our neighborhood transformed into a whimsical wonderland of ghosts, goblins, and ghouls. One year, my mom and I decided to host a pumpkin-carving party, and after paring down our pumpkins to eerie perfection, we turned our attention to cookies.
With flour dusting our noses and laughter echoing through the kitchen, we baked our very first haunted house cookies. The laughter became more spirited as we mixed vibrant icing colors, gluing graham crackers together like seasoned architects. Each cookie turned into a little work of art, dripping icing and glimmering sprinkles everywhere.
Fast-forward a few years, and those joyful kitchen memories stuck with me. I’ve since added my own spin, playing around with flavors and toppings. Nowadays, every Halloween season, I make sure to revisit those haunted houses—bringing a new generation of foodies into the kitchen for some fun! So, let’s create some creepy confections that are sure to elicit oohs and aahs from your taste buds and your guests!
Ingredients
To conjure up these Haunted House Cookies, here’s what you’ll need:
-
Sugar Cookies: The base of our spooky snack! Use your favorite sugar cookie recipe or a store-bought dough for convenience. If you want a gluten-free option, use almond flour or a gluten-free flour blend.
-
Icing: This is where the magic happens! You can make your own royal icing or grab a pre-made batch. For a more forgiving icing, try a simple powdered sugar glaze. It’s less fussy and still delish!
-
Decorative Candies: Think eyeballs, gummy worms, and candy corn! Use whatever candies bring out your spooky creativity. Substitute with healthier options like dried fruits for a twist!
-
Black Food Coloring: Essential for creating that eerie flair! You can also use activated charcoal for a natural option. Just be careful with the quantity; a little goes a long way!
-
Orange Food Coloring: Perfect for those cheerful Halloween vibes! If you want a natural alternative, consider using turmeric powder; however, it will impart some flavor and isn’t as vibrant.
-
Edible Markers: A fun way to add little details like windows, doors, and even spooky faces. If you can’t find these markers, use melted chocolate in a piping bag as a creative substitute.
Step-by-Step Instructions
Now that we have our ingredients lined up, let’s get baking those Haunted House Cookies!
Step 1: Prepare the Sugar Cookies
Start by preheating your oven to 350°F (175°C). While that’s warming up, roll out your sugar cookie dough on a floured surface to about 1/4 inch thick. To get that classic haunted house shape, you can use a cookie cutter (or craft your own design if you’re feeling adventurous). Cut out several cookie shapes – think rectangles for the base and triangles for the roof. The more variety, the better!
Chef Tip: Chill the cut shapes in the freezer for about 10 minutes before baking. This will help them retain their shape!
Step 2: Bake the Cookies
Place your cookies on a lined baking sheet and slide them into the oven for about 8-10 minutes, or until just golden around the edges. Keep an eye on them; you want soft, chewy cookies, not crispy ones for these haunted houses!
Chef Hack: If you accidentally overbake them, don’t panic! Just cover them with icing once they cool to disguise those little mistakes.
Step 3: Let Them Cool
Once baked, let the cookies cool on a wire rack. Patience is key here! You don’t want to ice warm cookies, or they will melt away into a sugar puddle. Allow them to cool completely—this usually takes about 30 minutes.
Step 4: Prepare the Icing
While the cookies cool, it’s time to make the icing! If you’re going for royal icing, beat together powdered sugar, egg whites, and a splash of cream of tartar until stiff peaks form. Divide the icing into smaller bowls and color them using your black and orange food coloring.
Extra Note: If you want to make it a bit more fun, flavor your icing with vanilla or almond extract!
Step 5: Decorate, Decorate, Decorate!
Once the cookies are cool and your icing is ready, grab your piping bags (or ziplock bags with a corner snipped off). Start outlining and filling in your cookie shapes with the colored icing. Let your creativity flow! Use the black icing for windows and doors and orange for spooky outlines.
Step 6: Add Decorative Candies and Details
While the icing is still wet, sprinkle your decorative candies with wild abandon! This is where the fun really begins—add gummy worms hanging off the edges, sprinkle some edible glitter for that extra spooky flair, or even pop some candy eyeballs on your creations.
Step 7: Final Touches
After decorating, use your edible markers to add those adorable finishing touches like spooky faces or intricate details on the cookies. Let the cookies sit undisturbed for about an hour to allow the icing to set completely.
Serving Suggestions
When it comes to presenting your Haunted House Cookies, think whimsical! Place them on a fun Halloween-themed platter surrounded by mini pumpkins or faux spider webs. You can even make a mini haunted village by arranging them together—turn your kitchen counter into a frightfully delightful buffet!
Recipe Variations
Now that you’ve mastered the basic Haunted House Cookies, let’s get creative! Here are a few fun twists to try:
-
Flavor Infusions: Mix almond extract into your sugar cookie dough for a unique taste!
-
Chocolate Houses: Use chocolate cookie dough instead of the classic sugar cookie for a rich twist.
-
Spooky Sprinkles: Use themed sprinkles (think ghosts or skulls!) to jazz up your cookies even more.
-
Healthy Substitutions: Consider using honey or maple syrup instead of sugar for a more natural sweetness.
-
Gluten-Free Option: Substitute the flour in your traditional sugar cookie recipe with almond flour for a gluten-free delight.
Chef’s Notes
As we all know, recipes can evolve over time. This Haunted House Cookie recipe itself has seen quite a transformation! Originally inspired by those childhood memories, I now love experimenting with different flavors and textures. Adding unexpected spices, like a hint of cinnamon or nutmeg, can take your cookies to the next level.
One of my funniest kitchen memories while making these cookies was accidentally using activated charcoal instead of regular black food coloring. I didn’t realize until I iced a batch and took a bite, expecting a sweet treat. Let’s just say the result was not the Halloween thrill I was hoping for—definitely a kitchen lesson learned!
FAQs and Troubleshooting
-
Why are my icing colors fading?
Icing colors can fade if they’re exposed to excess moisture. Always store your cookies in an airtight container, and consider using gel food coloring for more vibrant, lasting colors! -
Why are my cookies flat?
Flat cookies can be a result of overmixing the dough or not chilling it before baking. Next time, ensure your dough is chilled after cutting, and mix just until combined when adding your dry ingredients! -
How can I make the icing set faster?
You can put your decorated cookies in a cool, dry place. Avoid humid areas to prevent the icing from staying sticky. -
What if I don’t have edible markers?
No problem! Melt chocolate and place it in a piping bag to create fun designs on your cookies.
Nutritional Info (optional)
While I typically focus more on the joy of cooking rather than strict nutritional guidelines, Haunted House Cookies can generally be enjoyed as an occasional treat—in moderation, of course. Your sugar cookie base will typically yield around 100 calories per cookie, depending on the size and toppings.
There you have it—Haunted House Cookies that not only tantalize the taste buds but also bring joy and creativity into your kitchen. So this Halloween, let’s make some spooky memories! I can’t wait to hear how your haunted houses turn out, so don’t forget to share your creations! Happy baking! 🎃👻
PrintHaunted House Cookies
These delightfully creepy Haunted House Cookies are a perfect treat for Halloween, blending nostalgia and creativity for a spooky cooking experience.
- Prep Time: 30 minutes
- Cook Time: 10 minutes
- Total Time: 40 minutes
- Yield: 12 cookies
- Category: Dessert
- Method: Baking
- Cuisine: American
- Diet: Vegetarian
Ingredients
- Sugar Cookies (use your favorite recipe or store-bought dough)
- Icing (royal icing or powdered sugar glaze)
- Decorative Candies (eyeballs, gummy worms, candy corn)
- Black Food Coloring (or activated charcoal)
- Orange Food Coloring (or turmeric powder)
- Edible Markers (or melted chocolate for details)
Instructions
- Preheat your oven to 350°F (175°C).
- Roll out the sugar cookie dough on a floured surface to about 1/4 inch thick and cut out shapes.
- Chill the cut shapes in the freezer for about 10 minutes before baking.
- Bake the cookies for about 8-10 minutes, until golden around the edges.
- Let the cookies cool on a wire rack completely, about 30 minutes.
- Prepare the icing by beating together powdered sugar, egg whites, and cream of tartar until stiff peaks form.
- Color the icing with black and orange food coloring.
- Outline and fill in the cookie shapes with the colored icing.
- Add decorative candies while the icing is still wet.
- Use edible markers to add finishing touches once the icing has set for about an hour.
Notes
For a twist, mix almond extract into the sugar cookie dough or use chocolate cookie dough instead. Store cookies in an airtight container to prevent icing colors from fading.
Nutrition
- Serving Size: 1 cookie
- Calories: 100
- Sugar: 12g
- Sodium: 50mg
- Fat: 4g
- Saturated Fat: 2g
- Unsaturated Fat: 2g
- Trans Fat: 0g
- Carbohydrates: 15g
- Fiber: 0g
- Protein: 1g
- Cholesterol: 10mg
Keywords: Halloween, cookies, spooky, dessert, haunted house