Ghost Cheesecake Bars: A Spooktacular Treat
Welcome to my festive corner of the kitchen—Say hello to your new favorite treat, Ghost Cheesecake Bars! As the leaves turn and the days get shorter, there’s something enchanting about embracing the cozy, spooky vibes of autumn. If you’re ready to channel your inner chef and whip up a dessert that’s creamy, dreamy, and just a tad ghostly, you’ve come to the right place!
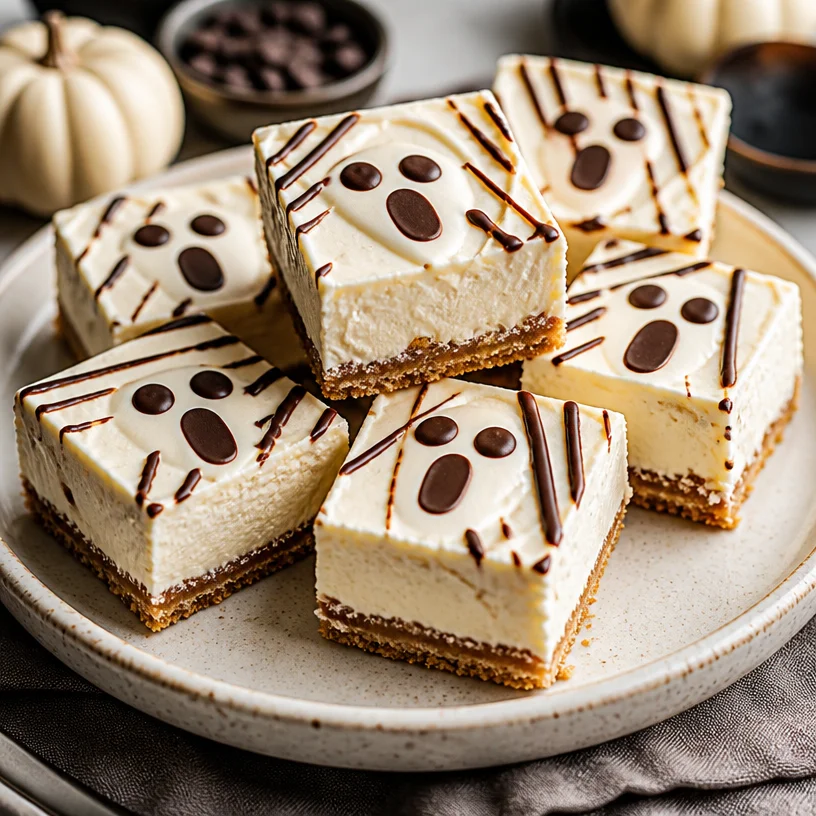
These Ghost Cheesecake Bars are not only a delightful nod to the Halloween season but also a deliciously fun experience to bake. Imagine sinking your spoon into a luscious cheesecake that’s nestled on a graham cracker crust, topped with playful chocolate decorations that make them look like little ghostly apparitions! Who said baking couldn’t be a little spooky and a whole lot of fun?
And let’s be honest, these bars aren’t just for Halloween—they are perfect for any fall gathering, movie night, or just to make a regular Tuesday feel a bit more magical. So, let’s gather our ingredients and dive into this amazing baking adventure together!
A Sweet Memory
I can’t talk about cheesecake without reminiscing about my childhood kitchen chaos. Growing up, my mom had a tradition of making cheesecake on the first day of autumn. It seemed like magic, transforming simple ingredients into this velvety dessert. I remember the excitement as we took turns mixing the batter, ‘taste-testing’ at every opportunity, and giggling when the batter would splatter everywhere. The kitchen was like our little laboratory, bubbling with joy and sprinkled with laughter.
One year, as we were blending away, we decided to add a twist: why not make it ghost-themed for Halloween? We dug into our chocolate stash, melted some down, and crafted tiny ghost faces on top of our cheesecake bars. From that moment, I set off on my own mission to create a batch of Ghost Cheesecake Bars that could do my childhood memory justice, while also sparking joy in anyone who tried them. If that doesn’t scream “comfort food” with a dash of nostalgia, I don’t know what does!
Ingredients
Let’s talk about the essential components of these Ghost Cheesecake Bars:
-
Cream Cheese: The star of the show! Aim for full-fat cream cheese for the richest flavor and texture. You can substitute with a lactose-free variety if you need a dairy-free option.
-
Graham Crackers: These form the delightful crunchy base. If you’re looking for a gluten-free alternative, consider crushed almonds or gluten-free cookies.
-
Sugar: Sweetness is key! I use granulated sugar, but you can experiment with brown sugar or coconut sugar for a caramel-like taste.
-
Vanilla Extract: A splash of this heavenly extract enhances the flavor of the cheesecake. Go for pure vanilla extract if you can—it’s worth it!
-
Butter: Unsalted butter helps to bind the crust beautifully. You could swap it with coconut oil for a dairy-free version.
-
Chocolate for Decoration: The finishing touch! Melted white chocolate is perfect for creating those adorable ghost faces. You could use dark chocolate if that tickles your fancy for a richer contrast.
Now that we’ve got our crew assembled, let’s dive into the fun part—baking!
Step-by-Step Instructions
Let’s get down to the nitty-gritty of making these Ghost Cheesecake Bars. Put on your apron, roll up your sleeves, and let’s have a blast!
-
Preheat Your Oven: Set the temperature to 325°F (160°C) and let it preheat while we mix things up. Hello, warm oven and cozy vibes!
-
Make the Crust:
- In a medium bowl, crush about 10 graham crackers until you have fine crumbs. You can use a food processor or a classic rolling pin—both methods work wonders!
- Melt 4 tablespoons of unsalted butter and pour it into the bowl of crumbs, mixing until everything is well combined (think wet sand).
- Press this mixture firmly into the bottom of a greased 9×9 inch baking dish. You want an even layer—don’t be shy! A flat-bottomed glass works perfectly for smoothing it down.
-
Mix the Cheesecake Filling:
- In a large mixing bowl, beat 2 blocks (16 oz) of softened cream cheese using a hand mixer until it’s nice and smooth. You want it to be fluffy and free of any lumps!
- Add in 1 cup of sugar and 1 teaspoon of vanilla extract, mixing well until fully blended. The key here is to scrape down the sides with a spatula once or twice to capture all ingredients.
- Next, you’ll want to add 2 large eggs, one at a time, mixing on low speed after each addition. Take care not to overmix—the secret to a smooth texture is to mix just until combined.
-
Bake The Bars:
- Pour the cheesecake filling over your graham cracker crust, smoothing the top with a spatula. It’s so satisfying—like pouring a river of sweetness!
- Bake in the preheated oven for about 30-35 minutes. You’ll know it’s done when the edges are set, but the center has a little jiggle (a tad wobbly is just fine).
- Once baked, allow the bars to cool completely at room temperature. Then, pop them in the fridge for at least 2 hours or preferably overnight. The longer, the better—the flavors meld so beautifully!
-
Decorate:
- Melt some white chocolate in a microwave-safe bowl. Give it 30 seconds at a time, stirring in between until it’s silky smooth.
- Cut your chilled cheesecake bars into squares and use a piping bag (or a sandwich bag with the corner snipped off) to draw ghost faces on each bar. Get creative—some can be cute little smiles while others can be spooky!
And voilà! Your Ghost Cheesecake Bars are ready to impress!
Serving Suggestions
To truly elevate your ghostly creation, consider serving these bars chilled on a lovely platter with some seasonal accents. Maybe a sprinkle of edible glitter for an extra magical touch, or pile on some colorful sprinkles—because sprinkles make everything more cheerful, right? A dollop of whipped cream on the side adds a nice touch, making each bite feel like a celebration!
Recipe Variations
Here are a few delicious twists to take your Ghost Cheesecake Bars to the next level:
-
Pumpkin Spice Twist: Swirl in some pumpkin puree and spices (like cinnamon and nutmeg) into the cheesecake batter for a fall-inspired flavor.
-
Fruit Puree Layer: Before topping with cream cheese filling, add a layer of raspberry or strawberry puree for a fruity surprise!
-
Chocolate Swirl: Drizzle some melted chocolate on the cheesecake before baking and gently swirl it with a knife for a marbled effect.
-
Vegan-Friendly: Use a dairy-free cream cheese substitute and swap the eggs for a mixture of ground flaxseed and water for a vegan version!
Chef’s Notes
Baking isn’t always perfect, but oh, the tales it leaves behind! I’ll never forget the time I was so eager to decorate my bars that I prepped the chocolate before the cheesecake had cooled properly. Let’s just say, I ended up with quite a chocolate ‘blob’ art piece instead of neat little ghost faces! It was a psychedelic masterpiece, though—and still delicious!
So, don’t worry if things get a bit messy. Embrace the joy of the kitchen. Every spill, every laugh—these are what make cooking memories. Just be sure to let your cheesecake chill appropriately; patience is a virtue, and trust me, it pays off when you can finally slice into those bars!
FAQs and Troubleshooting
-
Why did my cheesecake crack on top?
Cracking can happen if the batter is overmixed or if the bars are baked at too high a temperature. Try lowering the oven temp and mixing just until combined next time! -
How do I know when they are done baking?
Look for the edges set firmly while the center remains slightly jiggly. It will firm up while it cools! -
Can I use low-fat cream cheese?
Sure! Just keep in mind the texture may be a bit different. The cheesecake may not be as rich and creamy, but it’ll still taste good! -
How do I store these bars?
Store any leftovers in an airtight container in the fridge for up to a week (if they last that long!) or freeze them for later enjoyment.
Nutritional Info
These Ghost Cheesecake Bars are not only thick and creamy but also packed with delightful flavors! While they are a treat and a bit higher in sugars and fats, indulge mindfully and savor every moment.
There you have it! Your ultimate guide to creating Ghost Cheesecake Bars. Perfect for those fall gatherings or simply enjoying on a cozy night in, they are bound to bring some spooky joy to your table. Let’s create some sweet memories together—happy baking! 🍰👻
PrintGhost Cheesecake Bars
Delightfully spooky Ghost Cheesecake Bars with a creamy filling and graham cracker crust, perfect for Halloween or fall gatherings.
- Prep Time: 15 minutes
- Cook Time: 35 minutes
- Total Time: 120 minutes
- Yield: 16 servings 1x
- Category: Dessert
- Method: Baking
- Cuisine: American
- Diet: Vegetarian
Ingredients
- 2 blocks (16 oz) cream cheese, softened
- 10 graham crackers, crushed
- 4 tablespoons unsalted butter, melted
- 1 cup granulated sugar
- 1 teaspoon vanilla extract
- 2 large eggs
- Chocolate for decoration (preferably white chocolate)
Instructions
- Preheat your oven to 325°F (160°C).
- Make the crust: In a medium bowl, combine crushed graham crackers and melted butter until well combined. Press mixture into the bottom of a greased 9×9 inch baking dish.
- Mix the cheesecake filling: In a large bowl, beat cream cheese until smooth. Add sugar and vanilla, mixing well. Incorporate eggs one at a time, mixing until just combined.
- Pour the cheesecake filling over the crust, smoothing the top.
- Bake for 30-35 minutes until edges are set but center is slightly jiggly.
- Cool completely at room temperature, then refrigerate for at least 2 hours or overnight.
- Decorate with melted white chocolate to create ghost faces.
Notes
For a dairy-free option, substitute cream cheese and butter. Let cheesecake cool completely before decorating for best results. Serve chilled for a delightful treat.
Nutrition
- Serving Size: 1 bar
- Calories: 250
- Sugar: 18g
- Sodium: 290mg
- Fat: 12g
- Saturated Fat: 7g
- Unsaturated Fat: 3g
- Trans Fat: 0g
- Carbohydrates: 29g
- Fiber: 1g
- Protein: 4g
- Cholesterol: 50mg
Keywords: cheesecake, dessert, Halloween, spooky treats, fall recipes