
The Perfect Tart Cherry Pie: A Sweet Slice of Nostalgia
Hello, fellow food lovers! If there’s one dessert that warms my heart and brings back a wave of nostalgia, it’s undoubtedly tart cherry pie. Picture this: a golden, flaky crust cradling a luscious, tart cherry filling, the aroma wafting through the kitchen, beckoning family and friends to gather around the table. It’s not just a pie; it’s an experience, a memory, and, most importantly, a celebration of all things cozy and delicious!
When I think back to my childhood, I can almost hear the echoes of laughter and friendly banter as my family and I rallied together for pie-baking day. Every summer, when those juicy tart cherries came into season, it was like a rite of passage. My mom would whip up her famous tart cherry pie, and we kids were entrusted with the pivotal task of pitting the cherries. It was a sticky job, but the anticipation of devouring that first slice made it all worthwhile. You can bet we fought over who got to lick the spoon!
Fast forward to today, and I’ve added my twist to this classic recipe. My tart cherry pie brings a touch of creativity and playfulness without sacrificing that authentic homemade taste. So, grab your apron and let’s dive into this delightfully tart and sweet adventure together!
A Sweet Memory with Tart Cherries
I can still visualize that summer afternoon, arms deep in cherry juice, the sun streaming through the kitchen window. My siblings and I would compete to see who could pit the most cherries in the least amount of time. The kitchen would be adorned with laughter, the clinking of pie dishes, and the tantalizing scent of butter and sugar.
That specific tart cherry pie held a special place in my heart — it was the dessert that marked the beginning of summertime adventures. We’d pack slices for picnics or devour them straight from the pie plate topped with generous scoops of vanilla ice cream. With each bite, I’d be reminded of those cotton candy sunsets and warm evenings spent playing tag in the yard. It’s not just a dessert; it’s a connection to family and a reminder of how food can create lasting memories.
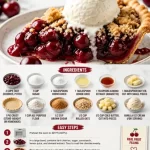
Ingredients You’ll Need for the Best Tart Cherry Pie
Let’s gather our ingredients! Here’s everything you need to create a tart cherry pie that will knock your socks off:
-
2 cups tart cherries, pitted: These are the star of the show! Tart cherries have that perfect balance of sour and sweet. You can use fresh or frozen cherries—just ensure they’re pitted. If you can’t find tart cherries, sour cherries will work beautifully in a pinch.
-
1 cup sugar: This sweetens the tart cherries and balances their flavor. You can substitute with a natural sweetener like coconut sugar or adjust to taste depending on your preference.
-
2 tablespoons cornstarch: This is our thickening agent. It helps to create that perfect pie filling texture. If you’re out of cornstarch, you can swap it for all-purpose flour using a little more, about 3 tablespoons.
-
1 tablespoon lemon juice: Enhancing the cherry flavor and providing a necessary acidic touch, lemon juice brings brightness to the filling. Don’t skip it! You could also use lime juice if you want to play with flavors.
-
1 teaspoon almond extract (amaretto): This is my secret weapon! Almond extract adds a delightful nutty note that complements the cherries perfectly. If you’re not a fan, you can use vanilla extract instead.
-
1 tablespoon butter, cut into small pieces: A little buttery goodness that adds richness to the filling. You can use unsalted butter or even a non-dairy alternative!
-
1 pie crust (store-bought or homemade): You can’t have pie without the crust! You can certainly make you own from scratch or save time with a store-bought version. If you’re feeling adventurous, a graham cracker crust can also work for a fun twist.
-
1 cup all-purpose flour, 1/2 cup brown sugar, 1/2 cup rolled oats, 1/2 cup cold butter, cut into pieces (for the crumb topping): This mixture creates a delightful crumb topping that adds texture. Swap the brown sugar for white sugar for a lighter topping, or use a gluten-free baking blend if needed.
-
Vanilla ice cream (for serving): Let’s be real, no cherry pie is complete without a scoop of creamy vanilla ice cream perched on top, melting into the warm pie filling!
Step-by-Step Instructions for Making Tart Cherry Pie
Now that we’ve got our ingredients together, let’s roll up our sleeves and get baking! Follow these steps, and you’ll have a beautiful tart cherry pie ready to impress.
Step 1: Prepare the Pie Crust
-
Preheat your oven to 425°F (220°C). Get that oven warm and ready to turn your pie into a golden masterpiece!
-
Roll out your pie crust. If you’re using store-bought, roll it out gently on a floured surface. If you’ve got a homemade crust, roll it out to fit a 9-inch pie dish. Make sure it’s about 1/8-inch thick.
-
Transfer the crust into your pie dish. Carefully place the rolled dough into the dish, gently pressing it into the corners. Don’t forget to trim any excess dough hanging over the edges.
-
Poke the base with a fork. A few fork pricks in the bottom will prevent any bubbly surprises during baking.
-
Pre-bake the crust for about 8-10 minutes. This will set it a bit before adding in that fabulous cherry filling. Let it cool slightly while you prepare the filling.
Step 2: Make Your Cherry Filling
-
In a medium bowl, combine the pitted tart cherries, sugar, cornstarch, lemon juice, and almond extract. Toss everything together gently but thoroughly until the cherries are well coated.
-
Let the mixture rest for about 10 minutes. This allows the cherries to release their juices, which will create a delicious, syrupy filling.
Step 3: Assemble Your Pie
-
Pour the cherry filling into the pre-baked pie crust, spreading it evenly.
-
Dot the filling with small pieces of butter spread across the top; this is where the richness comes from.
Step 4: Make the Crumb Topping
-
In a separate bowl, mix the all-purpose flour, brown sugar, and rolled oats. Stir until evenly combined.
-
Add the cold butter, using a pastry cutter or your fingers to incorporate, until the mixture becomes crumbly.
-
Sprinkle the crumb mixture evenly over the cherry filling. This adds a delightful crunch that complements the soft cherries beneath.
Step 5: Bake the Pie
-
Bake the pie at 425°F (220°C) for about 30-35 minutes or until the topping is golden and the filling is bubbling.
-
Keep an eye on it! If the crust edges begin to brown too quickly, use strips of aluminum foil to shield them.
Step 6: Cool and Serve
-
Let the pie cool for at least 30 minutes before slicing. This helps the filling set up nicely. The wait might be tough, but trust me, it’s worth it!
-
Serve your pie warm with a generous scoop of vanilla ice cream. Watch as it melts into the filling, creating the ultimate sweet experience!
Plating and Serving Suggestions
When it comes to serving your tart cherry pie, a simple slice on a beautiful dessert plate is all you need. I love to add a sprig of fresh mint for a pop of color and a hint of freshness. For that extra flair, drizzle a little more cherry juice or serve it with a dollop of whipped cream on top. It’s all about those delightful details!
Recipe Variations for Your Tart Cherry Pie
Now that you’ve baked a classic tart cherry pie, let’s explore some creative twists that will keep your pie-loving friends on their toes:
-
Add nuts: Chopped pecans or walnuts can be folded into the crumb topping for added crunch and flavor.
-
Mix in other fruits: Combining tart cherries with blueberries or raspberries creates a beautiful medley of flavors and colors.
-
Spices: Add a sprinkle of cinnamon or nutmeg to the filling for a warm spice kick that elevates the tartness of the cherries.
-
Chocolate drizzle: For all the chocolate lovers out there, a drizzle of dark chocolate over your slice can take it to another level of indulgence!
-
Gluten-free option: Swap regular flour for a gluten-free blend, and make sure to use gluten-free oats, creating a pie everyone can enjoy.
Chef’s Notes on Tart Cherry Pie
Oh, there’s so much joy to be found in pie-making! One of my favorite memories is when I decided to take my mom’s recipe and add a splash of amaretto. The nutty flavor gave it a delightful twist that sparked so many compliments. It’s a reminder that recipes can evolve, and personal touches can make them truly unique.
In the spirit of fun, I also love to experiment with different toppings—sometimes I go for a streusel style, other times simply whipped cream. All this to say, your tart cherry pie can change with your whims, and that’s the beauty of cooking!
FAQs and Troubleshooting Your Tart Cherry Pie
Let’s tackle some common questions and potential pitfalls so you can feel fully confident in making your pie!
Q1: My filling is too runny; what did I do wrong?
This can happen if the cherries are too juicy or if you didn’t add enough cornstarch. To fix this next time, ensure your cherries are well coated before pouring them into the crust, and consider increasing the cornstarch slightly. An alternative is to bake the pie slightly longer, allowing the juices to thicken.
Q2: The topping burned before the pie filled cooked through.
No one wants a burnt topping! If you notice this happening, simply cover the edges with aluminum foil to shield them from direct heat. If you’re baking at a higher temperature, reduce it slightly and increase your baking time to help the filling cook through.
Q3: Can I freeze the tart cherry pie?
Absolutely! After baking, let the pie cool completely, then wrap it tightly in plastic wrap and foil before freezing. When you’re ready to enjoy it, bake directly from frozen at 375°F (190°C) until warmed through, about 45-60 minutes.
Q4: What do I serve with tart cherry pie?
You can’t go wrong with a classic scoop of vanilla ice cream or a side of freshly whipped cream! It adds a creamy contrast that balances the tartness perfectly. You can also try dolloping some yogurt for a tangy twist.
Nutritional Info (Optional)
While I encourage everyone to indulge in enjoying dessert, here’s a rough idea for a single slice of tart cherry pie (based on a standard 8-slice pie):
- Calories: Approximately 250
- Total Fat: 12g
- Carbohydrates: 35g
- Sugars: 18g
- Protein: 2g
Conclusion
There you have it, my friends! A delightful tart cherry pie that not only warms the heart but also brings back cherished memories. It’s a dish meant for sharing, creating new memories, and savoring with those you love. So grab your spoon, invite your friends over, and let’s create something sweet and unforgettable together! Who knows? You may start your own summer cherry pie tradition! Happy baking! 🍒🥧
PrintThe Perfect Tart Cherry Pie
A delightful tart cherry pie with a flaky crust and a luscious filling that brings back memories of summer and family gatherings.
- Prep Time: 20 minutes
- Cook Time: 35 minutes
- Total Time: 55 minutes
- Yield: 8 servings 1x
- Category: Dessert
- Method: Baking
- Cuisine: American
- Diet: Vegetarian
Ingredients
- 2 cups tart cherries, pitted
- 1 cup sugar
- 2 tablespoons cornstarch
- 1 tablespoon lemon juice
- 1 teaspoon almond extract
- 1 tablespoon butter, cut into small pieces
- 1 pie crust (store-bought or homemade)
- 1 cup all-purpose flour
- 1/2 cup brown sugar
- 1/2 cup rolled oats
- 1/2 cup cold butter, cut into pieces (for the crumb topping)
- Vanilla ice cream (for serving)
Instructions
- Preheat your oven to 425°F (220°C).
- Roll out your pie crust to fit a 9-inch pie dish.
- Transfer the crust into your pie dish, pressing it into the corners.
- Poke the base with a fork to prevent bubbling.
- Pre-bake the crust for about 8-10 minutes and let it cool slightly.
- Combine the pitted tart cherries, sugar, cornstarch, lemon juice, and almond extract in a medium bowl.
- Let the mixture rest for 10 minutes.
- Pour the cherry filling into the pre-baked pie crust.
- Dot the filling with small pieces of butter.
- Mix all-purpose flour, brown sugar, and rolled oats in a separate bowl.
- Add the cold butter, stirring until the mixture becomes crumbly.
- Sprinkle the crumb mixture evenly over the cherry filling.
- Bake the pie for 30-35 minutes or until golden and bubbling.
- Let the pie cool for at least 30 minutes before slicing.
- Serve warm with a scoop of vanilla ice cream.
Notes
For a gluten-free option, swap regular flour for a gluten-free blend, and use gluten-free oats.
Nutrition
- Serving Size: 1 slice
- Calories: 250
- Sugar: 18g
- Sodium: 150mg
- Fat: 12g
- Saturated Fat: 7g
- Unsaturated Fat: 2g
- Trans Fat: 0g
- Carbohydrates: 35g
- Fiber: 2g
- Protein: 2g
- Cholesterol: 30mg
Keywords: cherry pie, dessert, summer recipe, nostalgia