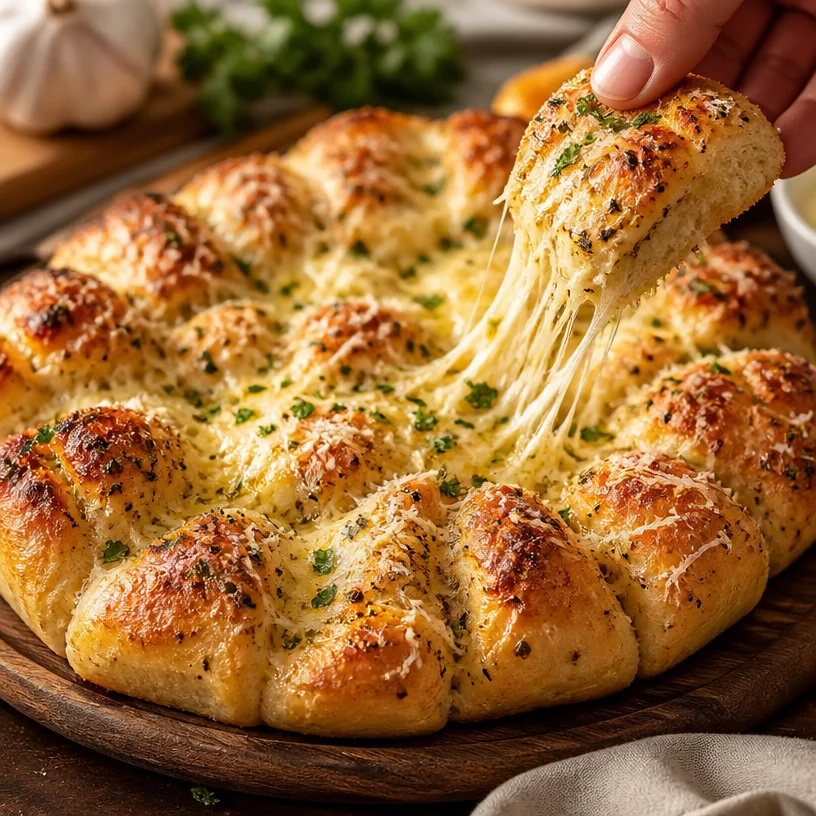
Parmesan Garlic Pull Apart Bread: The Ultimate Comfort Food
If you haven’t experienced the sheer joy of diving into a warm, buttery, and cheesy loaf of Parmesan Garlic Pull Apart Bread, then let me tell you, you’re missing out! Picture this: a golden-brown loaf, oozing with garlicky goodness and topped with a generous sprinkle of Parmesan cheese, ready to be torn apart into soft, fluffy pieces. This decadent treat is perfect for sharing among friends at a cozy gathering or for indulging in during a quiet night in. Plus, the aroma wafting through your kitchen will make you feel like a culinary rock star!
Creating this delightful pull-apart bread is not just about satisfying your taste buds; it’s about the joy of cooking. The act of pulling apart those fluffy pieces and slathering on gooey garlic butter fills the room with an air of fun! This bread invites you to be playful in the kitchen, a principle I cherish dearly here at Sprinkle Spoon. When you cook, it should feel less like a chore and more like an adventure, and this recipe embodies that spirit perfectly.
Now, let’s roll up our sleeves and transform a basic biscuit recipe into a mouthwatering, shareable loaf that’ll make everyone at your table squeal with delight. Are you ready? Let’s get cooking!
Personal Story: A Slice of Nostalgia
Every time I make Parmesan Garlic Pull Apart Bread, I’m transported back to my childhood kitchen, where my mom would whip up her famous garlic breadsticks. It was one of those comforting foods that made a long day fade away. I remember how she would let me smother them in garlic butter, eagerly awaiting the moment they’d emerge from the oven, golden and sizzling.
One stirring memory involves my little sister—she always tried to sneak a piece before they were fully cooked. I can still see her running down the hall, a guilty grin plastered across her face, as I caught her in the act. Those moments taught me that cooking is not just about the food; it’s about the memories made, the laughter shared, and the bonds built at the dinner table. Now, as I create my own version of that nostalgic warmth with Parmesan Garlic Pull Apart Bread, I always think of those days spent in the kitchen with my family—turning simple ingredients into pure love.
Ingredients
Before we dive into the steps, let’s assemble our squad of ingredients!
-
Biscuits: The backbone of our pull-apart bread. You can use refrigerated biscuit dough for convenience, but feel free to whip up your own homemade version if you’re feeling adventurous! If you’re gluten-free, there are wonderful options available that taste just as amazing!
-
Garlic Butter: This is where the magic really happens. You’ll need unsalted butter, minced garlic, and a pinch of salt. You can use regular butter if you don’t have unsalted on hand, but be cautious with additional salt!
-
Parmesan Cheese: The star ingredient that adds a nutty, salty flavor. Freshly grated Parmesan works best, but shredded cheese will do in a pinch. Looking for dairy-free options? Nutritional yeast can add a similar cheesy flavor!
-
Fresh Herbs (optional): A sprinkle of parsley or rosemary can elevate this dish even more, adding a fresh touch! These herbs are optional but recommended for that pop of color and flavor.
Step-by-Step Instructions
Now that we’ve gathered our ingredients, let’s make this delicious bread!
-
Preheat the Oven: First things first, preheat your oven to 375°F (190°C). This will ensure your bread bakes evenly and comes out perfectly golden.
-
Prepare the Garlic Butter: In a bowl, mix together ½ cup (1 stick) of unsalted butter, melted, with 3-4 cloves of minced garlic and a pinch of salt. Give it a good stir! You want all of that garlicky goodness to as evenly distributed as possible. Pro tip: Letting the butter cool slightly will prevent any unwanted splatters while mixing.
-
Prepare the Biscuits: If you’re using refrigerated biscuit dough, open that can with excitement! Tear each biscuit into quarters (or eighths if you’re feeling ambitious) and place them into a large mixing bowl. If you made your own biscuits, cut them into similar sized pieces so they bake evenly.
-
Add the Garlic Butter: Pour the garlic butter mixture over the biscuit pieces. Toss gently until all the biscuit pieces are well coated. This is where your inner chef can shine—make sure each piece gets a good saucy coating!
-
Layer and Sprinkle: Grease a bundt pan, or if you don’t have one, a regular oven-safe dish will work too. Start layering the biscuit pieces in the pan. Sprinkle a generous amount of Parmesan cheese between the layers—you want that cheesy goodness to make every bite special!
-
Final Touches: Once you’ve layered all the pieces, drizzle any remaining garlic butter over the top, and add more Parmesan if you’re feeling adventurous. Trust me, you can never have too much cheese!
-
Bake: Place your filled pan in the oven and bake for about 25-30 minutes or until the bread is golden brown and cooked through. Here’s a little chef hack: If you notice the top is browning too quickly, cover it loosely with aluminum foil for the remaining baking time.
-
Cool & Enjoy: Once out of the oven, let it cool for a few minutes before serving. This gives the bread a moment to set just enough to pull it apart easily without burning your fingers.
Serving Suggestions
Ahhhh, the best part! To serve your Parmesan Garlic Pull Apart Bread, simply turn it out onto a platter, or let it sit in the baking dish for a rustic presentation. Don’t forget to garnish it with some fresh herbs for a pop of color and a sprinkle of extra cheese! Pair it with marinara sauce or a zesty dipping sauce for that extra wow factor. It’s perfect as an appetizer for gatherings or as a side to your favorite soup or salad.
Recipe Variations
- Herbed Delight: Mix in some dried Italian herbs with your garlic butter for an herb-infused twist! Think along the lines of oregano, basil, or thyme.
- Spicy Kick: Add a dash of red pepper flakes to your garlic butter for a spicy version that’ll make your taste buds dance!
- Cheesy Jalapeño: Add finely chopped jalapeños or even some fresh green onion to the biscuit mixture for an extra layer of flavor.
- Sweet Twist: Feeling adventurous? Add a sprinkle of cinnamon and sugar to the biscuit mixture and serve it with a sweet cream cheese dip!
- Vegan Version: Substitute the butter with a plant-based alternative and use a vegan biscuit mix for a delicious dairy-free option!
Chef’s Notes
This recipe has evolved over time, and I’ve learned a few things along the way! One funny story involves my first attempt at this bread—let’s just say I got a little overzealous with the garlic, and my entire family could smell it for days! Now, I stick to the recommended amounts but still encourage everyone to adjust to personal taste. Cooking is all about having fun, after all! This dish has evolved into a staple at family gatherings and cozy nights in, and every batch has a little sprinkle of love mixed in!
FAQs and Troubleshooting
Q: Can I use frozen biscuit dough?
A: Absolutely! Just make sure to thaw it before you start tearing it apart.
Q: How do I know when the bread is done?
A: The bread should be golden brown on top; if you poke it with a toothpick and it comes out clean, you’re good to go!
Q: My pull-apart bread came out dense. What happened?
A: This could be due to overworking the biscuit dough. Be gentle when mixing, just enough to coat everything in deliciousness!
Q: Can I make this ahead of time?
A: You can prepare the biscuit pieces and garlic butter ahead of time, then refrigerate. Just toss everything together and bake when you’re ready!
Nutritional Info (Optional)
While the details can vary based on ingredients and serving size, one serving (based on 12 servings) of this Parmesan Garlic Pull Apart Bread roughly contains:
- Calories: 200
- Total Fat: 12g
- Saturated Fat: 7g
- Carbohydrates: 20g
- Protein: 4g
Keep in mind that indulging in delicious comfort food like this is all about balance!
So there you have it! Your step-by-step guide to making Parmesan Garlic Pull Apart Bread that will set your taste buds on fire (in the best way possible). I hope you get as much joy from making it as I do. Remember, it’s not just about the food; it’s about the memories you create along the way. Happy cooking!
PrintParmesan Garlic Pull Apart Bread
A warm, buttery, and cheesy loaf of Parmesan Garlic Pull Apart Bread, perfect for sharing or indulging.
- Prep Time: 15 minutes
- Cook Time: 30 minutes
- Total Time: 45 minutes
- Yield: 4 servings 1x
- Category: Appetizer
- Method: Baking
- Cuisine: Italian
- Diet: Vegetarian
Ingredients
- 1 can refrigerated biscuit dough (or homemade biscuit dough)
- ½ cup (1 stick) unsalted butter, melted
- 3–4 cloves minced garlic
- Pinch of salt
- 1 cup freshly grated Parmesan cheese (plus more for topping)
- Fresh herbs (optional, e.g., parsley or rosemary)
Instructions
- Preheat the oven to 375°F (190°C).
- Mix together the melted butter, minced garlic, and salt in a bowl.
- Tear the biscuit dough into quarters and place them in a large mixing bowl.
- Pour the garlic butter mixture over the biscuit pieces and toss gently.
- Grease a bundt pan and start layering the biscuit pieces, sprinkling Parmesan cheese between layers.
- Drizzle remaining garlic butter over the top and add more Parmesan if desired.
- Bake for 25-30 minutes until golden brown.
- Cool for a few minutes before serving.
Notes
Feel free to customize with herbs or spiciness. Serve with marinara or a zesty dipping sauce.
Nutrition
- Serving Size: 1 serving
- Calories: 200
- Sugar: 1g
- Sodium: 500mg
- Fat: 12g
- Saturated Fat: 7g
- Unsaturated Fat: 4g
- Trans Fat: 0g
- Carbohydrates: 20g
- Fiber: 1g
- Protein: 4g
- Cholesterol: 30mg
Keywords: pull apart bread, garlic bread, comfort food, appetizer, Italian cuisine